“Can you believe we actually pulled this off?” my sister whispered from across the kitchen, gesturing at the sprawling fruit and cheese board I’d just thrown together for our niece’s graduation party. Honestly, it was one of those last-minute moments — the kind where you realize you forgot to plan snacks and the clock is ticking faster than you want to admit. I grabbed whatever colorful fruits were still fresh in the fridge and a few cheese wedges from the deli, not expecting much. But somehow, this simple, no-fuss board turned into the centerpiece of the celebration.
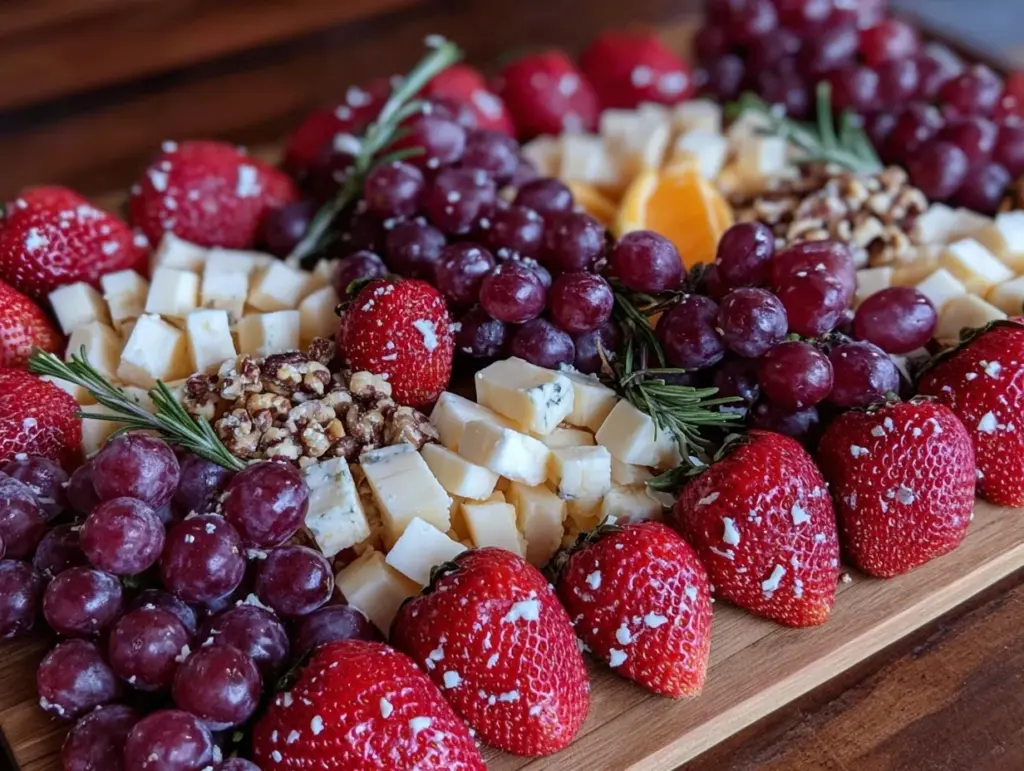
The vibrant reds of strawberries, the deep purples of grapes, and the creamy golden hues of aged cheddar made the whole thing pop — and people kept coming back for more. I remember watching my niece’s friends casually reach for a slice of brie paired with a juicy pear slice, and that quiet moment where I thought, “Okay, this might actually be perfect.” It wasn’t planned with precision or fancy ingredients, but it felt just right. That’s the charm of a fruit and cheese board made with a bit of heart and a lot of ease.
What stuck with me was how effortless it was to create something that looked festive but didn’t require hours or a mountain of dishes. It’s the kind of recipe that suits the vibe of celebrations, where food brings people together without overshadowing the reason we’re there—honoring milestones and making memories. I’ve refined this board over a few graduations now, each time learning what combos truly delight the palate and what simple touches make it memorable.
So, if you’re looking for a reliable, crowd-pleasing idea that’s as much about the celebration as the flavors, this Perfect Fruit and Cheese Graduation Board is your answer. It’s not just a snack; it’s a little edible party that invites everyone to relax, chat, and savor the moment.
Why You’ll Love This Recipe
After testing this fruit and cheese board through several graduation parties and casual get-togethers, I can confidently say it hits all the right notes. Here’s why it’s become my go-to for celebrations:
- Quick & Easy: You can have it ready in under 20 minutes, which is a lifesaver when you’re juggling last-minute party prep.
- Simple Ingredients: No need to hunt down specialty stores — most of these items are pantry staples or easy to find at your local market.
- Perfect for Celebrations: Whether it’s a graduation, baby shower, or casual brunch, this board sets a festive tone without fuss.
- Crowd-Pleaser: From kids to adults, the combination of sweet fruits and savory cheeses always gets compliments and plenty of second servings.
- Unbelievably Delicious: The texture contrast — creamy cheese, crisp fruit, crunchy nuts — paired with balanced flavors hits that satisfying comfort spot.
What sets this board apart is the deliberate balance of textures and flavors. For example, blending a creamy, tangy goat cheese with the crunch of toasted almonds and the burst of fresh berries creates a sensory experience. I also like to include a dash of honey or a sprinkle of fresh herbs for that extra subtle twist, something I picked up from assembling cheese balls for other parties. It’s the kind of recipe that feels both relaxed and thoughtful, perfect for showing you care without adding stress.
In the end, this board is more than just food — it’s a way to gather people around a shared table and celebrate milestones with something bright, fresh, and satisfying.
What Ingredients You Will Need
This recipe uses simple, wholesome ingredients to deliver bold flavor and satisfying texture without the fuss. Most items are pantry staples or easy to find fresh, and substitutions are straightforward if you need them.
- Cheese Selection:
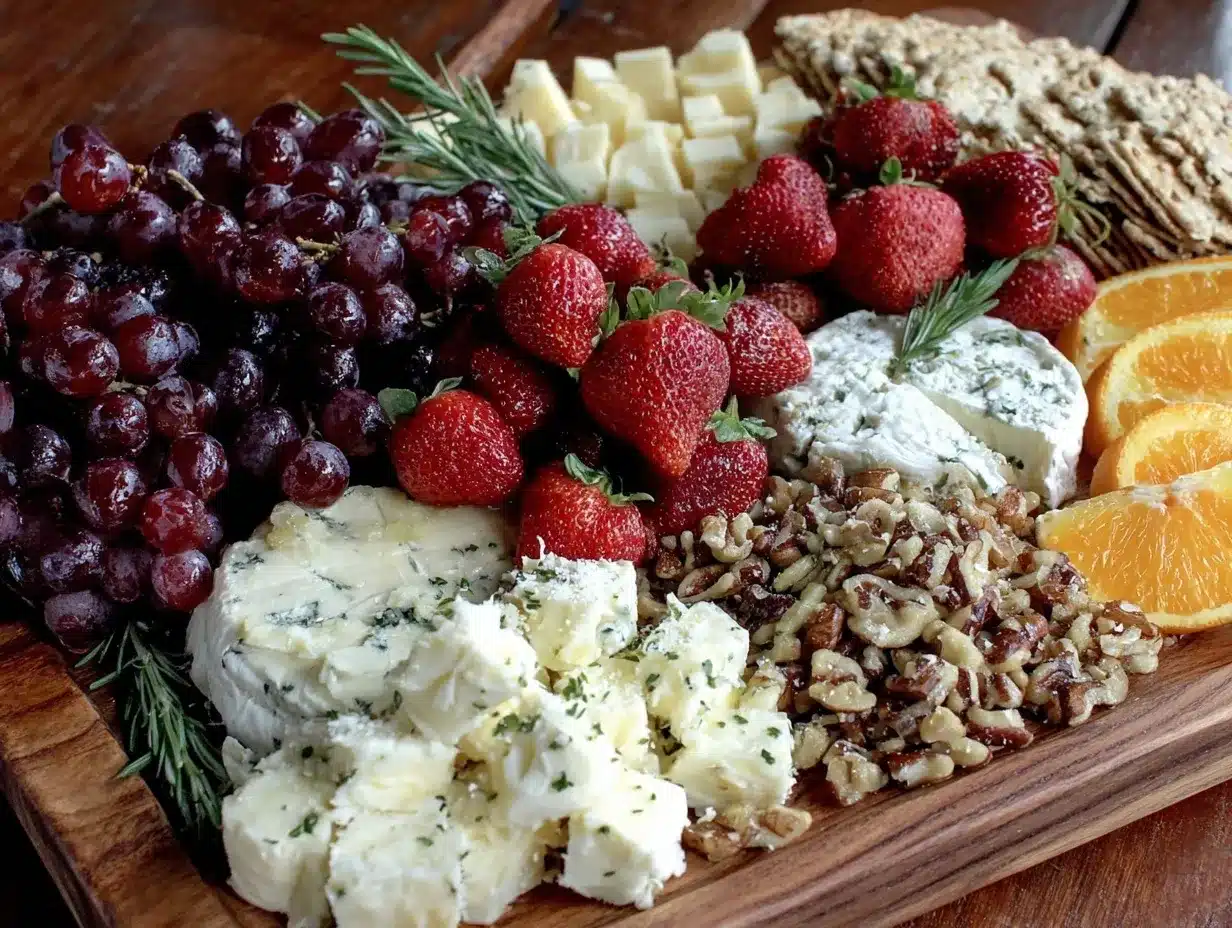
- Aged cheddar, sliced (for a sharp, firm bite)
- Brie or camembert wheel (soft, creamy texture)
- Goat cheese log, plain or herbed (adds tang and creaminess)
- Manchego or gouda cubes (nutty, slightly sweet flavor)
- Fresh Fruit:
- Strawberries, hulled and halved (bright and juicy)
- Seedless red or green grapes (easy finger food)
- Pears, sliced thin (ripe but firm for easy handling)
- Apple slices, lightly tossed in lemon juice to prevent browning
- Fresh figs or dried apricots (seasonal, optional for extra sweetness)
- Crunchy Extras:
- Toasted almonds or walnuts (for crunch and depth)
- Honey or fig jam (for drizzling or dipping)
- Crackers or baguette slices (choose sturdy types for holding cheese)
- Fresh Herbs & Garnishes:
- Fresh rosemary sprigs or thyme (adds aroma and color)
- Edible flowers (optional, for presentation)
If you want a gluten-free option, swap regular crackers for rice crackers or gluten-free crisps. For dairy-free cheese alternatives, almond-based cheeses work well, though texture varies. When buying cheese, I like brands like Cabot for cheddar and Président for brie — they offer consistent quality that really makes a difference. Seasonal fruit swaps are great, too; in summer, fresh berries or peaches can replace pears or apples.
Equipment Needed
Assembling this fruit and cheese graduation board requires minimal equipment, which is perfect for stress-free celebrations. Here’s what you’ll need:
- A large wooden or slate serving board — it’s all about presentation, and a good board makes arranging the items easy and visually appealing.
- A sharp cheese knife set — a soft cheese knife for brie and a harder blade for cheddar or manchego help cut clean slices without squishing.
- Small bowls or ramekins — for holding honey, jams, or nuts separately so they don’t mix prematurely.
- Paring knife and cutting board — for slicing fruit thinly and prepping garnishes.
- Tongs or small forks — handy for guests to pick up fruit or cheese without using fingers.
If you don’t have a fancy serving board, a clean cutting board or even a platter works fine. For cheese knives, I’ve found that a basic set from most kitchen stores works just as well as pricey options if they’re sharp and comfortable. Keeping your knives sharp (honest, it makes a huge difference) will save you frustration when slicing soft cheeses like brie.
Preparation Method
- Prep the Fruit (10 minutes): Wash and dry all your fruit thoroughly. Hull and halve strawberries, slice pears and apples thinly then toss apple slices in a bit of lemon juice to prevent browning. Remove grapes from stems in small clusters. If using figs or dried fruits, make sure they’re fresh and plump. The goal is to have bite-sized pieces that are easy to pick up.
- Slice the Cheese (5 minutes): Using a sharp cheese knife, slice the aged cheddar into thin wedges or bite-sized cubes. Cut the brie wheel into small, spreadable wedges. Slice goat cheese log into small rounds or crumble it roughly for texture contrast. Arrange cheese pieces so they’re ready to place on the board — keep the soft cheeses separate to avoid squishing.
- Toast the Nuts (5 minutes): In a dry skillet over medium heat, toast almonds or walnuts for 3-4 minutes until fragrant and lightly browned, stirring frequently to prevent burning. Let cool completely before adding to the board — this gives the nuts a deeper flavor and crunch.
- Arrange the Board (10-15 minutes): Start by placing cheese pieces spaced out on your board, giving enough room to build around them. Fill empty spaces with clusters of fruit, alternating colors and textures to create visual interest. Scatter toasted nuts in small piles, and add crackers or baguette slices along the edges. Place small bowls with honey or fig jam in convenient spots for drizzling or dipping. Garnish with fresh herbs and edible flowers if using.
- Final Touches: Give the board a quick scan — does it look balanced? Add extra fruit or crackers to fill gaps, and wipe any stray crumbs. Keep the board covered with plastic wrap if not serving immediately to keep fruit fresh.
Remember, the key to a great board is variety and balance. If you notice one side looks heavier or less colorful, rearrange a few pieces. I like to prep fruit and cheese separately, so assembly feels more like a creative puzzle than a rushed task. This also helps prevent soft fruit juices from making crackers soggy, a lesson learned the hard way during one party.
Cooking Tips & Techniques
Putting together a fruit and cheese board might seem straightforward, but a few tricks make it truly shine. Here’s what I’ve learned:
- Choose Cheese with Different Textures: Combining firm, soft, and crumbly cheeses keeps every bite interesting. For instance, pair sharp cheddar with creamy brie and tangy goat cheese.
- Keep Fruit Fresh: Slicing fruit just before serving helps avoid browning and moisture buildup. Toss apple slices in lemon juice to keep them crisp and bright.
- Mind the Temperature: Cheese tastes best at room temperature. Take it out of the fridge 30 minutes before serving to let flavors open up.
- Watch the Cracker Placement: Place crackers on the edges of the board, away from juicy fruit, to keep them crunchy. This avoids the dreaded soggy cracker syndrome.
- Mix Colors and Shapes: Alternate colors and shapes to make the board visually appealing. Round grapes next to sharp cheddar wedges create a nice contrast.
- Don’t Overcrowd: Give each ingredient its own space so guests can easily pick what they want without digging or smushing other items.
One of my early missteps was piling everything in one spot, which made the board look messy and guests hesitate to dig in. After that, I started thinking like a food stylist — and it really changed the vibe. Also, I multitask by prepping fruit and cheese while my oven is heating up for other party snacks, like the crispy baked turkey sliders that pair wonderfully with this board.
Variations & Adaptations
This fruit and cheese board is super flexible and adapts well to different tastes and dietary needs. Here are some ideas to mix it up:
- Seasonal Swaps: In summer, add fresh peaches, cherries, or berries in place of pears and apples for a fresh twist.
- Dietary Adjustments: For a vegan option, use plant-based cheeses like cashew or almond varieties and pair with dried fruits like apricots and figs.
- Flavor Twists: Add a spicy element like pickled jalapeños or a drizzle of chili honey to give the board a surprising kick.
- Cooking Method Variations: Try grilling some pineapple slices or peaches for a smoky sweetness that contrasts beautifully with sharp cheeses.
- Personal Favorite: I once added a creamy dill pickle cheese ball alongside the traditional cheeses — it was a hit and gave guests something unexpected. You can find that recipe here.
Feel free to swap crackers for crostini or breadsticks, and experiment with nuts like pistachios or pecans depending on what you have on hand. This board is your blank canvas to create a personalized celebration snack that suits your style.
Serving & Storage Suggestions
Serve this fruit and cheese graduation board at room temperature for the best flavor and texture. I like to place it near the drinks station so guests can nibble as they mingle.
Pair it with crisp white wines, sparkling water with a splash of citrus, or a light cocktail like mojitos for a refreshing contrast. If you want to make it a fuller meal, adding ham and cheese croissants alongside can turn the spread into a satisfying brunch or light dinner.
To store leftovers, wrap the board tightly with plastic wrap and refrigerate for up to 2 days. Keep crackers separate to maintain crunch. When reheating, simply allow cheeses to come back to room temperature and serve fresh fruit slices to replace any that have softened.
Flavors tend to meld nicely overnight, especially if you add a drizzle of honey or jam just before serving again. Just watch the fruit for any signs of moisture buildup and refresh as needed.
Nutritional Information & Benefits
This fruit and cheese board offers a balanced mix of nutrients that make it a guilt-free party favorite. Here’s a rough estimate per serving (about 1/6th of the board):
| Calories | 250-300 kcal |
|---|---|
| Protein | 10-12 g |
| Fat | 18-20 g (mostly from cheese and nuts) |
| Carbohydrates | 15-18 g (mainly from fruit and crackers) |
| Fiber | 3-4 g |
Cheese provides calcium and protein, while fruit contributes vitamins, antioxidants, and dietary fiber. Toasted nuts add healthy fats and a satisfying crunch. This recipe can be gluten-free or dairy-free with simple swaps, making it accessible for many dietary needs.
From a wellness standpoint, combining fresh fruit with quality cheese offers a nice balance of indulgence and nutrition — perfect for a celebration where you want to enjoy food without overdoing it.
Conclusion
This Perfect Fruit and Cheese Graduation Board is more than a pretty platter — it’s a celebration in edible form. It’s adaptable, simple, and has just the right mix of flavors and textures to bring people together around good food and good company. I love how it takes minimal effort but still looks like you put in serious thought, making it a staple for marking special moments.
Feel free to tailor the ingredients, try new combinations, or add your favorite jams and nuts to make it truly yours. After all, the best boards carry a little personal story on every bite.
When you try this recipe, I’d love to hear what twists you put on it or how it fit into your celebration. Sharing those moments keeps the joy of cooking alive and inspires others to gather around their own tables with confidence and warmth.
FAQs
What cheeses work best for a fruit and cheese board?
A mix of textures is ideal: firm cheeses like aged cheddar or manchego, soft cheeses like brie or camembert, and tangy options like goat cheese offer a balanced flavor profile.
Can I prepare the board in advance?
You can prep fruit and slice cheese a few hours ahead but assemble the board shortly before serving to keep fruit fresh and crackers crisp.
How do I prevent fruit from browning?
Toss sliced apples or pears in a little lemon juice immediately after cutting to slow oxidation and keep them looking fresh.
What are good alternatives for gluten-free or vegan guests?
Use gluten-free crackers or rice crisps and plant-based cheeses made from nuts or soy to accommodate dietary restrictions.
How do I store leftovers?
Wrap leftovers tightly and refrigerate for up to 2 days. Keep crackers separately to maintain crunch, and refresh fruit slices if needed before serving again.
Pin This Recipe!
Perfect Fruit and Cheese Graduation Board

A quick and easy fruit and cheese board perfect for celebrations like graduations, featuring a balanced mix of textures and flavors with simple, fresh ingredients.
- Prep Time: 20 minutes
- Cook Time: 5 minutes
- Total Time: 25 minutes
- Yield: 6 servings
- Category: Appetizer
- Cuisine: American
Ingredients
- Aged cheddar, sliced
- Brie or camembert wheel
- Goat cheese log, plain or herbed
- Manchego or gouda cubes
- Strawberries, hulled and halved
- Seedless red or green grapes
- Pears, sliced thin
- Apple slices, lightly tossed in lemon juice
- Fresh figs or dried apricots (optional)
- Toasted almonds or walnuts
- Honey or fig jam
- Crackers or baguette slices
- Fresh rosemary sprigs or thyme
- Edible flowers (optional)
Instructions
- Wash and dry all fruit thoroughly. Hull and halve strawberries, slice pears and apples thinly then toss apple slices in lemon juice to prevent browning. Remove grapes from stems in small clusters. Ensure figs or dried fruits are fresh and plump if using.
- Using a sharp cheese knife, slice aged cheddar into thin wedges or bite-sized cubes. Cut brie wheel into small, spreadable wedges. Slice goat cheese log into small rounds or crumble roughly. Arrange cheese pieces separately to avoid squishing soft cheeses.
- Toast almonds or walnuts in a dry skillet over medium heat for 3-4 minutes until fragrant and lightly browned, stirring frequently. Let cool completely before adding to the board.
- Arrange cheese pieces spaced out on the serving board. Fill empty spaces with clusters of fruit, alternating colors and textures. Scatter toasted nuts in small piles and add crackers or baguette slices along edges. Place small bowls with honey or fig jam for drizzling or dipping. Garnish with fresh herbs and edible flowers if using.
- Check the board for balance and add extra fruit or crackers to fill gaps. Wipe any stray crumbs. Cover with plastic wrap if not serving immediately to keep fruit fresh.
Notes
Keep cheese at room temperature 30 minutes before serving for best flavor. Toss apple slices in lemon juice to prevent browning. Place crackers on edges away from juicy fruit to avoid sogginess. Prepare fruit and cheese separately to avoid moisture issues. Store leftovers wrapped tightly in refrigerator up to 2 days, keep crackers separate.
Nutrition
- Serving Size: About 1/6th of the b
- Calories: 275
- Sugar: 12
- Sodium: 250
- Fat: 19
- Saturated Fat: 8
- Carbohydrates: 17
- Fiber: 3.5
- Protein: 11
Keywords: fruit and cheese board, graduation party, easy appetizer, celebration snack, cheese platter, fruit platter, party food


