
The sizzle of bacon, the aroma of ground beef browning, and gooey cheese oozing out of soft, golden dough—now, that’s the kind of dinner that brings everyone running to the kitchen. The first time I made these bacon cheeseburger bombs, I was honestly just looking for a fun way to shake up our weeknight routine. What happened next was a full-on family obsession! If you’re craving comfort food that’s playful, totally satisfying, and ridiculously easy to whip up, this recipe is about to become your new go-to.
Why do I keep coming back to bacon cheeseburger bombs? For starters, they’re like the best parts of a classic cheeseburger, all wrapped up in a fluffy, handheld package. Plus, there’s the magic of my quick, tangy special sauce that takes everything over the top. Whether you need a kid-friendly dinner, a game-day snack, or something to impress picky eaters (my little ones are notorious for turning up their noses at anything “fancy”), these bacon cheeseburger bombs absolutely deliver. I’ve tweaked, tested, and baked them more times than I can count—so you’re getting my most reliable, flavor-packed version right here.
If you love recipes that bring a bit of fun to the table, are perfect for sharing, and taste like pure comfort, you’re in the right place. Bacon cheeseburger bombs are easy enough for a rushed Tuesday night dinner but special enough to serve at a party. Let’s face it—there’s just something about melted cheese and smoky bacon that makes everyone happy, isn’t there?
Why You’ll Love This Bacon Cheeseburger Bombs Recipe
- Quick & Easy: These bacon cheeseburger bombs come together in just under 40 minutes from start to finish (no advanced skills needed!).
- Simple Ingredients: You probably have most of what you need in your fridge and pantry already—think ground beef, bacon, cheese, and some ready-made biscuit dough.
- Perfect for Any Occasion: Whether it’s a family dinner, birthday party, or tailgate, these bombs fit right in. They’re portable, mess-free, and totally crowd-pleasing.
- Kid-Approved: My kids devour these without a single complaint, and honestly, that’s saying something. Even picky eaters can’t resist the cheesy, meaty goodness.
- Unbelievably Delicious: The combination of crispy bacon, melty cheese, juicy beef, and golden biscuit is pure comfort. The special sauce adds a tangy, creamy finish that ties everything together.
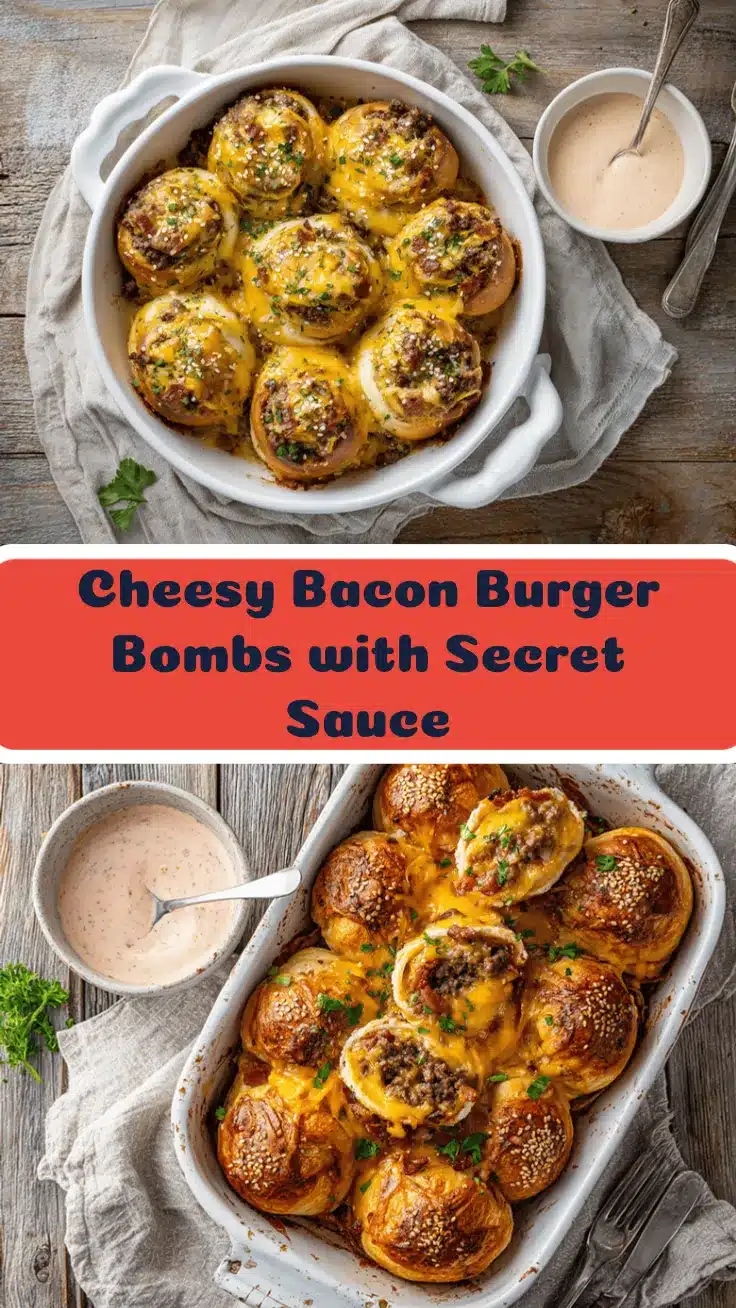
What really makes this bacon cheeseburger bombs recipe stand out? For one, I blend the ground beef with a bit of onion and seasoning so every bite is juicy and never bland. Instead of just tucking in a slice of cheese, I use cubes of sharp cheddar for maximum meltiness—trust me, those little pockets of cheese are everything. And yes, the bacon is cooked until perfectly crisp before getting tucked inside (nobody wants limp bacon, right?).
Plus, let’s talk about that special sauce—tangy, creamy, a little bit sweet, a little bit spicy. It’s the secret weapon that takes these from good to “can I have the recipe?” territory. I’ve served these at birthday parties, neighborhood BBQs, and even as a quick after-school snack. Every single time, they disappear faster than I can put them on the table. If you want a recipe that’s effortless, satisfying, and just plain fun, you’re going to love these bacon cheeseburger bombs as much as my family does.
What Ingredients You Will Need
This recipe uses simple, everyday ingredients to create bold flavors and a satisfying, melty center—no complicated shopping lists or hard-to-find items here! Here’s what you’ll need for bacon cheeseburger bombs with special sauce:
- For the Bacon Cheeseburger Bombs:
- 1 lb (450g) ground beef (80/20 lean-to-fat ratio works best for juicy filling)
- 6 slices bacon (thick-cut for extra flavor, but any bacon works—go with your favorite!)
- 1/2 small yellow onion, finely chopped (adds a bit of sweetness and keeps the meat moist)
- 1/2 tsp salt (adjust to taste)
- 1/4 tsp black pepper
- 1/2 tsp garlic powder
- 1 tsp yellow mustard (for a classic burger flavor—Dijon or spicy brown works, too)
- 1 can (16 oz/450g) refrigerated biscuit dough (8 large biscuits; I like Pillsbury Grands, but generic brands work fine)
- 8 cubes cheddar cheese (about 3/4-inch/2cm each) (sharp cheddar melts best, but American or Colby-Jack are great, too)
- 1 egg, beaten (for brushing—gives that shiny, golden finish)
- Sesame seeds (optional) (for topping, just like a classic burger bun!)
- Pickle chips (optional) (for serving, bring that real cheeseburger vibe)
- For the Special Sauce:
- 1/3 cup (80g) mayonnaise
- 2 tbsp ketchup
- 1 tbsp yellow mustard
- 1 tbsp sweet pickle relish
- 1 tsp white vinegar (or apple cider vinegar)
- 1/4 tsp smoked paprika (regular paprika is fine in a pinch)
- Pinch of cayenne pepper (optional) (for a little heat)
- Salt and black pepper to taste
Ingredient notes: If you’re gluten-free, swap the biscuit dough for your favorite gluten-free version. Turkey bacon can be used if you’re avoiding pork, and plant-based cheese works if you need dairy-free. Feel free to experiment—sometimes I throw in a few chopped jalapeños for a spicy kick, or use pepper jack cheese for extra flavor. The recipe is all about flexibility!
Equipment Needed
- Large skillet or frying pan: For browning beef and crisping bacon. Nonstick or cast iron works great (I swear by my old cast iron for the best bacon crispiness).
- Baking sheet: Standard half-sheet pan (lined with parchment paper for easy cleanup).
- Mixing bowls: One big bowl for the filling, another for making the special sauce.
- Cutting board and sharp knife: For dicing onion, chopping bacon, and cubing cheese.
- Measuring spoons and cups: Precision makes a difference with the special sauce!
- Pastry brush: For brushing beaten egg over the dough. If you don’t have one, use the back of a spoon.
- Small spoon or scoop: For portioning out the filling (an ice cream scoop works in a pinch).
If you don’t have parchment, lightly grease your baking sheet with oil or nonstick spray. And if you’re using a smaller oven, just bake in batches. My tip: Wash the skillet right after browning the beef—it’s way easier before anything hardens. I’ve used everything from budget pans to fancy ones and, honestly, as long as the bacon gets crispy and nothing sticks, you’re golden.
How to Make Bacon Cheeseburger Bombs with Special Sauce

- Preheat your oven: Set it to 375°F (190°C). Line a baking sheet with parchment paper (or grease it lightly if you don’t have parchment).
- Cook the bacon: In a large skillet over medium heat, cook 6 slices of bacon until crispy (about 6–8 minutes). Drain on paper towels, then chop into small pieces. Don’t rush this step—crispy bacon gives the best texture!
- Sauté the beef and onion: Pour off most bacon fat, leaving about 1 tablespoon in the skillet. Add 1 lb (450g) ground beef and 1/2 small onion. Cook, breaking up the beef, until browned and onion is soft (about 5–6 minutes). Season with 1/2 tsp salt, 1/4 tsp black pepper, 1/2 tsp garlic powder, and 1 tsp mustard. Stir in chopped bacon. Remove from heat and let cool for 5 minutes.
- Cube the cheese: Cut 8 cubes of cheddar cheese (about 3/4 inch/2cm each). I like to cut them just before assembly to keep them cold—cold cheese melts slower and stays inside the bomb!
- Prepare the biscuit dough: Open the can of biscuit dough and separate into 8 rounds. Flatten each round into a 4-inch (10cm) circle using your fingers or a rolling pin. If dough is sticky, dust lightly with flour.
- Stuff and shape the bombs: Place 2 tablespoons of beef mixture in the center of each dough circle. Top with a cube of cheese. Carefully pull the edges of the dough up and over the filling, pinching tightly to seal. If any tears appear, pinch or patch with a bit of extra dough. Place seam side down on the baking sheet.
- Egg wash and sesame seeds: Brush each bomb with beaten egg. Sprinkle with sesame seeds if you like that classic burger look.
- Bake: Bake in preheated oven for 15–18 minutes, or until golden brown and puffed. If the tops brown too quickly, cover loosely with foil for the last few minutes.
- Make the special sauce: While the bombs bake, combine 1/3 cup mayo, 2 tbsp ketchup, 1 tbsp mustard, 1 tbsp relish, 1 tsp vinegar, 1/4 tsp paprika, and a pinch of cayenne in a bowl. Stir well and season to taste with salt and black pepper. Chill until ready to serve.
- Serve: Let the bombs cool for 5 minutes before serving (the cheese will be lava-hot!). Serve with a side of special sauce and optional pickle chips.
Troubleshooting: If bombs open during baking, the dough may not have been sealed tightly—just press the edges together a little more next time. If cheese leaks, make sure the cubes are fully enclosed. Don’t over-stuff or the bombs might burst (I learned the hard way—less is more!).
Cooking Tips & Techniques
- Don’t skip the cooling step for the filling: Hot beef will melt the biscuit dough and make it tricky to seal. Letting it cool means neater bombs.
- Chill the cheese: Keep cheese cubes in the fridge until you’re ready to assemble. I once let mine warm up on the counter—hello, cheese explosions!
- Seal the dough well: Pinch, twist, and even patch with a bit of extra dough if you need to. If you see beef peeking through, add a bit more dough over the gap.
- Batch cooking: If making a double batch, brown all your beef at once and bake in two rounds. The bombs reheat beautifully!
- Watch the bake time: Ovens vary—start checking at 15 minutes. If your bombs are browning too fast on top, tent with foil.
- Keep the dough cold: If your kitchen is warm, pop the shaped bombs in the fridge for 5–10 minutes before baking. It helps them puff up better and hold their shape.
I’ve overstuffed, underbaked, and even forgotten the cheese a time or two (don’t ask)—but honestly, even my “mistakes” tasted great. These bombs are forgiving, so don’t stress if yours aren’t perfect looking. The flavor is what matters!
Variations & Adaptations
- Gluten-Free: Use a gluten-free biscuit dough or homemade gluten-free bread dough. You can even use gluten-free pizza dough in a pinch.
- Spicy Kick: Add chopped jalapeños to the beef filling or use pepper jack cheese instead of cheddar for a little heat. Sometimes I sneak in a dash of hot sauce to the special sauce!
- Vegetarian Option: Swap the beef and bacon for plant-based ground and veggie bacon, and use your favorite vegan cheese cubes. The method stays exactly the same.
- Breakfast Bombs: Replace beef with breakfast sausage, and add a scrambled egg with the cheese. Top with a sprinkle of everything bagel seasoning instead of sesame seeds.
- Pizza Cheeseburger Bombs: Mix a little pizza sauce and chopped pepperoni into the beef filling for a pizza-burger mashup.
I’ve tried a Tex-Mex version with taco seasoning, pepper jack, and a little salsa in the beef—so fun! Get creative and adapt to your cravings or dietary needs. That’s what makes these bacon cheeseburger bombs such a winner for busy nights and picky eaters alike.
Serving & Storage Suggestions
Bacon cheeseburger bombs are best served warm, right out of the oven, with the special sauce on the side for dipping. I love to add a few pickle chips on the plate for crunch and zing—classic cheeseburger vibes! For a full meal, pair with a simple green salad, crispy fries, or even a bowl of tomato soup. If you’re hosting friends, serve these on a platter with toothpicks and extra sauce for easy sharing.
Leftovers? No problem! Store cooled bombs in an airtight container in the fridge for up to 3 days. To reheat, pop them in a 350°F (175°C) oven for 7–10 minutes, or microwave for 30–40 seconds (the oven keeps them crispier, though). These also freeze beautifully—wrap each bomb individually and freeze up to 2 months. Thaw in the fridge overnight before reheating. The flavors actually get richer after a day, so don’t be surprised if they taste even better the next day.
Nutritional Information & Benefits
Each bacon cheeseburger bomb (without sauce) is roughly 320 calories, 17g protein, 19g fat, and 22g carbs—perfect for a hearty meal or satisfying snack. The recipe packs a solid dose of protein from beef and cheese, and you can easily lighten it up by using lean ground turkey, turkey bacon, or reduced-fat cheese. For gluten-free folks, sub in GF dough. Allergens: contains dairy, gluten, and egg (in the wash)—swap as needed for dietary needs.
Personally, I love how these bombs hit that perfect spot between indulgent and balanced. They’re filling, portable, and much easier to control portion-wise than a huge burger. Plus, you get all the fun of a cheeseburger with less mess!
Conclusion
If you’re looking for a dinner that feels special, tastes like your favorite cheeseburger, and comes together with zero fuss, these bacon cheeseburger bombs are the answer. They’re endlessly adaptable, crowd-pleasing, and seriously fun to make (kids love helping stuff and seal the dough!). I keep this recipe in my back pocket for busy weeknights, parties, and anytime I want to put a smile on everyone’s face.
Give them a try and don’t be afraid to put your own spin on things—different cheeses, toppings, or even a spicy twist. That’s what makes cooking at home so enjoyable! If you make these, I’d love to hear how they turned out—drop a comment, share a photo, or tell me your favorite variation. Happy cooking, and here’s to bacon cheeseburger bombs that bring people together, one cheesy bite at a time!
FAQs About Bacon Cheeseburger Bombs
Can I make bacon cheeseburger bombs ahead of time?
Absolutely! Assemble the bombs up to a day ahead and keep them covered in the fridge. Bake just before serving for best results. You can also freeze them before baking—just add a couple of minutes to the bake time if cooking from frozen.
What’s the best cheese to use for these?
Sharp cheddar melts best and has classic cheeseburger flavor, but American, Colby-Jack, or pepper jack all work. Use what you love!
Can I make these without biscuit dough?
Yes! Pizza dough or crescent roll dough are great substitutes. The texture will be slightly different, but still delicious.
How do I keep the cheese from leaking out?
Make sure the cheese cube is fully enclosed by the dough and pinch the seams well. Keep the cheese cold until you’re ready to stuff—this helps prevent leaks.
Is the special sauce spicy?
Nope, it’s mostly tangy and creamy. If you like heat, just add a pinch of cayenne or a few drops of hot sauce to taste!
Pin This Recipe!
Bacon Cheeseburger Bombs with Special Sauce

These Bacon Cheeseburger Bombs are a fun, handheld twist on the classic cheeseburger, featuring juicy beef, crispy bacon, and melty cheddar cheese wrapped in golden biscuit dough. Served with a tangy special sauce, they’re perfect for family dinners, parties, or game-day snacks.
- Prep Time: 20 minutes
- Cook Time: 18 minutes
- Total Time: 38 minutes
- Yield: 8 bombs 1x
- Category: Main Course
- Cuisine: American
Ingredients
- 1 lb ground beef (80/20 lean-to-fat ratio)
- 6 slices bacon (thick-cut preferred)
- 1/2 small yellow onion, finely chopped
- 1/2 tsp salt
- 1/4 tsp black pepper
- 1/2 tsp garlic powder
- 1 tsp yellow mustard
- 1 can (16 oz) refrigerated biscuit dough (8 large biscuits)
- 8 cubes cheddar cheese (about 3/4-inch each)
- 1 egg, beaten (for brushing)
- Sesame seeds (optional, for topping)
- Pickle chips (optional, for serving)
- 1/3 cup mayonnaise
- 2 tbsp ketchup
- 1 tbsp yellow mustard
- 1 tbsp sweet pickle relish
- 1 tsp white vinegar (or apple cider vinegar)
- 1/4 tsp smoked paprika
- Pinch of cayenne pepper (optional)
- Salt and black pepper to taste
Instructions
- Preheat oven to 375°F (190°C). Line a baking sheet with parchment paper or lightly grease it.
- In a large skillet over medium heat, cook bacon until crispy (about 6–8 minutes). Drain on paper towels and chop into small pieces.
- Pour off most bacon fat, leaving about 1 tablespoon in the skillet. Add ground beef and onion. Cook, breaking up beef, until browned and onion is soft (about 5–6 minutes). Season with salt, black pepper, garlic powder, and mustard. Stir in chopped bacon. Remove from heat and let cool for 5 minutes.
- Cut cheddar cheese into 8 cubes (about 3/4 inch each). Keep cheese cold until ready to use.
- Open biscuit dough and separate into 8 rounds. Flatten each round into a 4-inch circle.
- Place 2 tablespoons of beef mixture in the center of each dough circle. Top with a cube of cheese. Pull edges of dough up and over filling, pinching tightly to seal. Place seam side down on baking sheet.
- Brush each bomb with beaten egg. Sprinkle with sesame seeds if desired.
- Bake for 15–18 minutes, or until golden brown and puffed. If tops brown too quickly, cover loosely with foil.
- While bombs bake, make the special sauce: In a bowl, combine mayonnaise, ketchup, mustard, relish, vinegar, paprika, and cayenne. Stir well and season with salt and black pepper to taste. Chill until serving.
- Let bombs cool for 5 minutes before serving. Serve with special sauce and optional pickle chips.
Notes
Let the beef filling cool before assembling to prevent melting the dough. Keep cheese cubes cold to avoid leaks. Seal dough tightly to prevent bombs from opening during baking. For gluten-free, use GF biscuit dough. Bombs can be assembled ahead and baked later, or frozen before baking. Leftovers reheat well in the oven.
Nutrition
- Serving Size: 1 bomb
- Calories: 320
- Sugar: 3
- Sodium: 670
- Fat: 19
- Saturated Fat: 8
- Carbohydrates: 22
- Fiber: 1
- Protein: 17
Keywords: bacon cheeseburger bombs, cheeseburger bombs, easy dinner, special sauce, kid-friendly, party food, game day, comfort food, handheld, biscuit dough, ground beef, bacon, cheddar cheese