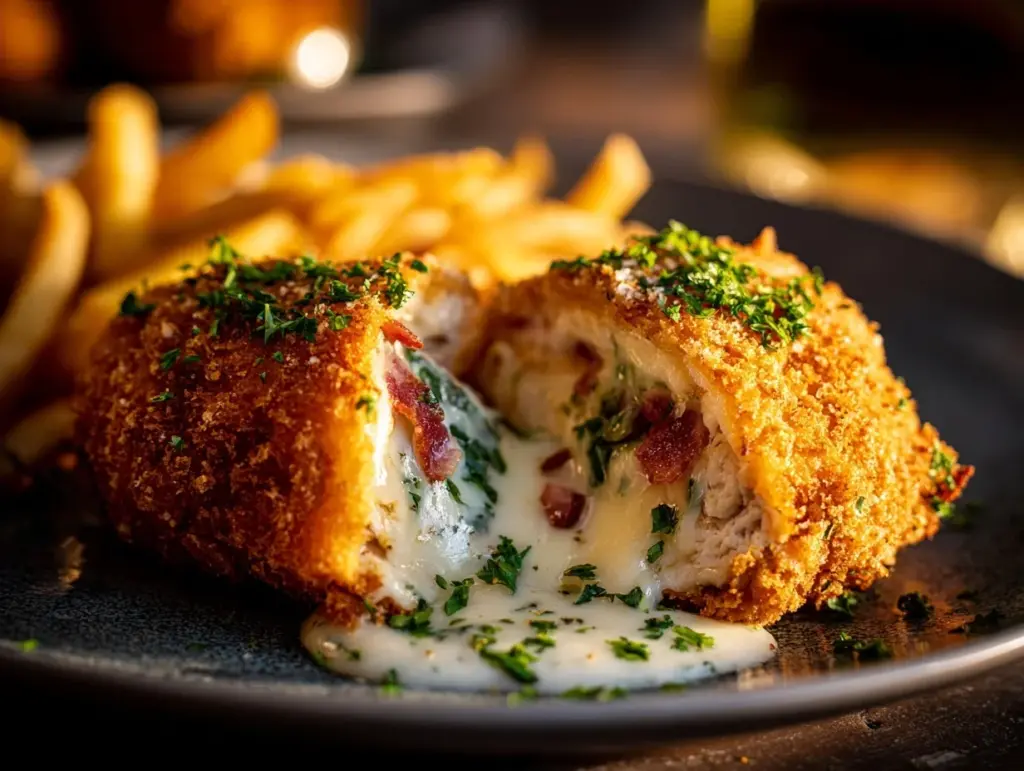
The crunch of golden breadcrumbs, the ooey-gooey burst of buttery garlic filling—Chicken Kiev is the kind of recipe that feels like a hug on a plate. The first time I made it, I couldn’t believe how simple it was to achieve such a restaurant-worthy dish at home. Whether it’s for a cozy family dinner or to impress guests, this Chicken Kiev recipe is guaranteed to become a favorite. Trust me, you’ll fall in love with the crispy crust and the luscious, flavorful center that makes every bite unforgettable.
Years ago, Chicken Kiev felt like one of those fancy dishes reserved for special occasions or ordered at upscale restaurants. But after a few tries in my own kitchen (and a couple of messy failures—I’ll admit it!), I’ve perfected a method that’s easy, foolproof, and absolutely delicious. If you’ve ever been intimidated by the idea of making this classic dish, let me assure you: it’s more approachable than you think! Plus, it’s a dish that brings together comfort and elegance in one go.
This Chicken Kiev recipe has everything: crispy breading, tender chicken, and a filling that’s bursting with buttery, garlicky goodness. Ready to give it a try? Let’s dive into why you’ll love it!
Why You’ll Love This Recipe
- Perfectly Crispy: The breadcrumb coating fries up to golden, crunchy perfection, locking in all the juices.
- Ooey-Gooey Center: The buttery garlic filling melts beautifully, creating a rich and indulgent flavor burst.
- Simple Ingredients: Made with pantry staples you probably already have—no need to hunt down fancy items.
- Great for Any Occasion: Whether it’s a weeknight dinner or a special celebration, this dish fits the bill.
- Customizable: You can tweak the filling to suit your taste—add fresh herbs, Parmesan, or even a hint of lemon zest.
What really sets this Chicken Kiev apart is how straightforward the process is. There’s nothing overly complicated here, but the result feels like you’ve spent hours in the kitchen. The buttery filling is the star—garlic, parsley, and a hint of salt blend together to create a flavor explosion. And let’s not forget the crisp, golden coating that makes every bite irresistibly satisfying!
This isn’t just food; it’s a whole experience. The moment you cut into the chicken and the filling oozes out, you know you’re in for something magical. Let’s talk ingredients!
What Ingredients You Will Need
This Chicken Kiev recipe uses simple ingredients to create a dish that’s full of flavor and texture. Here’s what you’ll need:
- Chicken Breasts: Boneless and skinless, pounded thin for even cooking.
- Unsalted Butter: Softened to room temperature for the filling.
- Garlic: Freshly minced for that bold flavor.
- Parsley: Chopped finely to add a pop of freshness to the filling.
- Salt: For seasoning the filling and chicken.
- All-Purpose Flour: To coat the chicken and help the breading stick.
- Eggs: Beaten to create a layer for the breadcrumbs to adhere to.
- Panko Breadcrumbs: For a light, crispy crust (regular breadcrumbs work too).
- Vegetable Oil: For frying—choose a neutral oil like canola or sunflower.
You can also customize the filling with extras like lemon zest, Parmesan cheese, or chives. Want to make it gluten-free? Swap the flour and breadcrumbs with gluten-free alternatives. Now, let’s get those tools ready!
Equipment Needed
- Meat Mallet: For pounding the chicken evenly (a rolling pin works in a pinch).
- Mixing Bowl: To combine the buttery garlic filling.
- Plastic Wrap: Helps shape and chill the chicken rolls.
- Three Bowls: One each for flour, beaten eggs, and breadcrumbs.
- Large Frying Pan: Heavy-bottomed for even frying.
- Tongs: For flipping the chicken without damaging the coating.
If you don’t have a meat mallet, no worries—you can use the bottom of a heavy skillet to pound the chicken. Just be gentle! Okay, let’s get cooking.
Preparation Method

- Make the Filling: In a bowl, mix softened butter, minced garlic, chopped parsley, and a pinch of salt. Form the mixture into a log using plastic wrap and chill in the freezer for 15-20 minutes.
- Prepare the Chicken: Place a chicken breast between two sheets of plastic wrap and gently pound with a meat mallet until it’s about 1/4-inch thick. Repeat for all pieces.
- Assemble the Rolls: Cut the butter log into pieces and place one in the center of each chicken breast. Fold the sides over the butter and roll tightly. Secure with toothpicks if needed.
- Coat the Chicken: Set up three bowls: one with flour, one with beaten eggs, and one with breadcrumbs. Dip each chicken roll first in flour, then eggs, then breadcrumbs, ensuring an even coating.
- Chill the Rolls: Place the breaded chicken rolls in the fridge for 30 minutes to help the coating stick and prevent butter leakage during frying.
- Fry to Perfection: Heat oil in a large frying pan over medium heat. Fry the chicken rolls for 3-4 minutes per side, or until golden brown and crispy. Transfer to a baking sheet.
- Finish Cooking: Bake the chicken rolls in a preheated oven at 375°F (190°C) for 10-15 minutes to ensure they cook through completely.
- Serve: Let the Chicken Kiev rest for 5 minutes before serving. This helps the filling stay inside when cut.
Pro tip: If the butter starts to leak while frying, don’t panic—it happens to the best of us! Just remove the chicken from the oil quickly and adjust the heat. Let’s talk techniques to keep everything perfect.
Cooking Tips & Techniques
- Keep the Butter Cold: Chilling the filling helps it hold its shape during frying and baking.
- Pound Evenly: Make sure the chicken is uniformly thin to cook evenly and roll neatly.
- Chill Before Frying: Refrigerating the breaded chicken helps the coating adhere and prevents the butter from leaking.
- Control Oil Temperature: Keep the oil at medium heat to avoid burning the coating before the chicken cooks through.
- Use Panko Breadcrumbs: They create a lighter, crunchier crust compared to regular breadcrumbs.
One lesson I learned the hard way? Don’t skip the chilling steps—it’s tempting to rush, but it makes all the difference! Now, let’s explore some fun variations.
Variations & Adaptations
- Herb-Filled: Add dill, chives, or thyme to the filling for an herby twist.
- Cheesy Kiev: Mix shredded Parmesan or sharp cheddar into the butter filling for extra indulgence.
- Gluten-Free: Use gluten-free flour and breadcrumbs to make this dish celiac-friendly.
- Baked Version: Skip the frying and bake at 400°F (200°C) for 25 minutes instead (use a wire rack for crisping).
- Lemon Zest: Add a hint of lemon zest to the filling for a refreshing citrus note.
One of my favorite variations is the cheesy version—it’s like garlic bread and Chicken Kiev had a baby. Now let’s talk how to plate and store this beauty!
Serving & Storage Suggestions
Serving: Serve Chicken Kiev hot, with a side of creamy mashed potatoes or steamed veggies. Don’t forget a drizzle of the buttery filling that escapes—it’s pure liquid gold.
Storage: Leftovers can be stored in an airtight container in the fridge for up to 3 days. For longer storage, wrap tightly and freeze for up to 2 months.
Reheating: Reheat in the oven at 350°F (175°C) for 10-15 minutes to maintain crispness. Avoid microwaving—it makes the coating soggy.
Pro tip: The flavors actually deepen after a day, making leftovers just as delicious (if not better!).
Nutritional Information & Benefits
Estimated Per Serving:
- Calories: 450
- Protein: 30g
- Fat: 25g
- Carbohydrates: 20g
Health Benefits: Chicken provides lean protein, while garlic and parsley add antioxidants and vitamins. Opting for baked versions can cut down on fat content, making this recipe adaptable to lighter diets.
While indulgent, it’s a dish that can be balanced with healthier sides like roasted vegetables. Let’s wrap things up!
Conclusion
There’s a reason Chicken Kiev has stood the test of time—it’s the ultimate comfort food that feels fancy without the fuss. From the crispy, golden crust to the gooey, flavorful filling, this recipe is a showstopper in every way. Whether you’re making it for a celebration or just a cozy night in, it’s a dish that’ll have everyone asking for seconds.
Don’t be afraid to experiment and make this recipe your own. Add herbs, cheese, or even a spicy twist to the filling—the possibilities are endless! I’d love to hear how this Chicken Kiev turns out for you. Leave a comment below, share your adaptations, or tag me on social media with your creations!
Happy cooking, and may your Chicken Kiev always be crispy, gooey, and oh-so-perfect!
FAQs
Can I bake Chicken Kiev instead of frying?
Yes! You can bake it at 400°F (200°C) for 25 minutes. Use a wire rack to ensure the coating stays crispy.
What can I serve with Chicken Kiev?
Mashed potatoes, steamed vegetables, or a simple green salad pair beautifully with this dish.
How do I prevent the butter from leaking?
Make sure the filling is chilled and tightly sealed inside the chicken. Also, chilling the breaded chicken before frying helps.
Can I freeze Chicken Kiev?
Absolutely! Wrap uncooked rolls tightly in plastic wrap and freeze for up to 2 months. Thaw before frying or baking.
Is there a gluten-free option for this recipe?
Yes, use gluten-free flour and breadcrumbs for a celiac-friendly version. The taste and texture are just as amazing!
Pin This Recipe!
Chicken Kiev Recipe Perfected Easy Crispy and Gooey Dinner Idea

Chicken Kiev combines crispy breading, tender chicken, and a buttery garlic filling for a restaurant-worthy dish that’s easy to make at home.
- Prep Time: 20 minutes
- Cook Time: 30 minutes
- Total Time: 50 minutes
- Yield: 2 servings 1x
- Category: Main Course
- Cuisine: European
Ingredients
- 2 boneless, skinless chicken breasts
- 4 tablespoons unsalted butter, softened
- 2 cloves garlic, minced
- 2 tablespoons parsley, chopped
- 1/2 teaspoon salt
- 1/2 cup all-purpose flour
- 2 eggs, beaten
- 1 cup panko breadcrumbs
- Vegetable oil for frying
Instructions
- In a bowl, mix softened butter, minced garlic, chopped parsley, and a pinch of salt. Form the mixture into a log using plastic wrap and chill in the freezer for 15-20 minutes.
- Place a chicken breast between two sheets of plastic wrap and gently pound with a meat mallet until it’s about 1/4-inch thick. Repeat for all pieces.
- Cut the butter log into pieces and place one in the center of each chicken breast. Fold the sides over the butter and roll tightly. Secure with toothpicks if needed.
- Set up three bowls: one with flour, one with beaten eggs, and one with breadcrumbs. Dip each chicken roll first in flour, then eggs, then breadcrumbs, ensuring an even coating.
- Place the breaded chicken rolls in the fridge for 30 minutes to help the coating stick and prevent butter leakage during frying.
- Heat oil in a large frying pan over medium heat. Fry the chicken rolls for 3-4 minutes per side, or until golden brown and crispy. Transfer to a baking sheet.
- Bake the chicken rolls in a preheated oven at 375°F (190°C) for 10-15 minutes to ensure they cook through completely.
- Let the Chicken Kiev rest for 5 minutes before serving.
Notes
Chilling the butter filling and breaded chicken helps prevent leakage during frying. Use panko breadcrumbs for a lighter, crunchier crust.
Nutrition
- Serving Size: 1 chicken roll
- Calories: 450
- Fat: 25
- Carbohydrates: 20
- Protein: 30
Keywords: Chicken Kiev, crispy chicken, garlic butter, comfort food, easy dinner, fried chicken, European cuisine