Introduction
Let me paint you a picture—the air outside is crisp, leaves are crunching underfoot, and the scent of spiced pumpkin filling mingles with melting butter as it wafts from my oven. It’s the kind of aroma that practically wraps you up in a fuzzy blanket. The first time I made this cozy pumpkin dump cake, I was instantly hooked. I remember standing in my kitchen, spoon in hand, sneaking a taste straight from the pan (not even sorry!) while the whipped topping waited patiently in the fridge. It was one of those moments where you pause, take a deep breath, and just know you’ve stumbled onto something truly special.
Honestly, this pumpkin dump cake recipe feels like it was made for those chilly autumn afternoons when you want nostalgia and comfort without fuss. Years ago, my grandma used to whip up pumpkin desserts that brought the whole family running. She’d say, “If you can open a can and melt butter, you’re halfway there!”—and she was right. That’s the spirit behind this recipe: simple, homey, and dangerously easy.
I first tried this for a rainy Sunday get-together, hoping to impress my in-laws (and maybe distract the kids from their screens). Let’s face it, the cake barely survived cooling—my family couldn’t stop sneaking forkfuls! Now, it’s a staple for potlucks, Thanksgiving, and even weeknight sweet cravings. You know what? I wish I’d discovered pumpkin dump cake years ago. It’s pure, nostalgic comfort with a creamy whipped topping that takes things up a notch. I’ve tested it more times than I care to admit—in the name of research, of course—and you’re going to want to bookmark this one. It feels like a warm hug in dessert form, and trust me, it’ll brighten up your Pinterest board and your kitchen.
Why You’ll Love This Recipe
Over the years, I’ve baked dozens of pumpkin desserts (some turned out as doorstops, others as family legends). This pumpkin dump cake is one I keep coming back to—here’s why:
- Quick & Easy: Comes together in under an hour. You don’t even need a mixer—just layer and bake. Perfect for busy weeknights, last-minute guests, or when you crave something sweet but don’t want a big mess.
- Simple Ingredients: No fancy grocery trips required; you probably have everything in your pantry right now. It’s a relief, honestly, when you realize you can whip up something special without a shopping spree.
- Perfect for Fall Gatherings: Whether it’s Thanksgiving, Friendsgiving, or a cozy Sunday dinner, this recipe brings autumn vibes to your table. It’s got that “everyone will ask for seconds” magic.
- Crowd-Pleaser: Both kids and adults go wild for it. The creamy pumpkin filling with the crumbly topping is a combo that never fails. I’ve seen picky eaters sneak extra servings!
- Unbelievably Delicious: The texture is somewhere between pumpkin pie and buttery cake—so satisfying. That whipped topping adds a creamy finish you’ll dream about.
What makes this pumpkin dump cake different? For starters, the spice balance is just right—not overwhelming, but enough to really taste autumn. I use a little trick: melted butter over the cake mix gives an extra golden crunch. The whipped topping isn’t just an afterthought; it’s the creamy cloud that makes every bite irresistible.
This isn’t just another dump cake. It’s comfort food, made easier and maybe even a little better for you. If you’re looking for a dessert that’s fuss-free but feels special, this is it. Whether you want to impress guests or just treat yourself after a long day, this is the kind of recipe that makes you close your eyes with the first bite. It’s a little slice of happiness, honestly, and the kind of thing you’ll want to share (or keep all to yourself—I won’t judge!).
What Ingredients You Will Need
This pumpkin dump cake recipe uses simple, wholesome ingredients to deliver bold pumpkin flavor and a satisfying, creamy texture—no complicated steps, no hard-to-find items. Most are pantry staples, and you can swap a few if needed. Here’s what you’ll need:
- For the Pumpkin Layer:
- 1 (15 oz / 425g) can pure pumpkin puree (not pumpkin pie filling)
- 1 cup (200g) granulated sugar (you can use light brown sugar for a deeper flavor)
- 1 (12 oz / 355ml) can evaporated milk (for creaminess, or substitute whole milk if needed)
- 3 large eggs, room temperature
- 2 teaspoons pumpkin pie spice (or use 1 tsp cinnamon + 1/2 tsp nutmeg + 1/2 tsp ginger)
- 1/2 teaspoon salt
- 1 teaspoon vanilla extract (I love Nielsen-Massey for its rich flavor)
- For the Cake Layer:
- 1 box (15.25 oz / 432g) yellow cake mix (classic is best, but spice cake works too)
- 3/4 cup (170g) unsalted butter, melted (adds richness and helps the topping get golden)
- 1 cup (120g) chopped pecans or walnuts (optional, but adds crunch)
- For the Whipped Topping:
- 2 cups (480ml) heavy whipping cream, cold
- 1/4 cup (30g) powdered sugar (for sweetness)
- 1 teaspoon vanilla extract
Ingredient tips from my kitchen: Use Libby’s pumpkin puree for consistent texture. If you’re out of evaporated milk, whole milk plus 2 tablespoons heavy cream works in a pinch. For gluten-free, swap with your favorite GF cake mix. I’ve even tried dairy-free whipped topping with coconut cream—it’s surprisingly good!
In the summer, you can add fresh berries on top after baking, or sprinkle cinnamon sugar on the whipped topping. If nuts are a no-go, just leave them out or swap with mini chocolate chips for a sweet twist. This recipe is so forgiving, you can tweak it to fit your pantry or taste buds. (Let’s be honest, sometimes you just use what you’ve got!)
Equipment Needed
Honestly, this pumpkin dump cake doesn’t require much—one of the things I love about it. Here’s what you’ll need:
- 9×13-inch (23x33cm) baking dish or casserole pan (glass or metal both work)
- Large mixing bowl (for the pumpkin layer)
- Whisk or electric hand mixer (for smooth pumpkin filling)
- Measuring cups and spoons
- Rubber spatula
- Small saucepan (for melting butter)
- Stand mixer or hand mixer (for whipped topping, though a whisk and elbow grease work in a pinch!)
- Offset spatula or spoon (for spreading whipped topping)
If you don’t have a 9×13 dish, two 8×8 pans will do—just watch the bake time. I’ve used ceramic and glass pans; glass gives a slightly softer bottom, while metal crisps up the edges. For the whipped topping, a chilled bowl helps it whip faster, even if you’re using a hand whisk. Budget-friendly tip: thrift stores often have great baking pans for cheap, and a handheld mixer will be your best friend if you bake often. Just keep your tools dry and clean for best results!
Preparation Method
Ready to make your cozy pumpkin dump cake? Here’s the step-by-step breakdown:
- Preheat your oven: Set to 350°F (175°C). Grease your 9×13-inch baking dish with butter or nonstick spray. This prevents sticking and makes serving easier.
-
Mix the pumpkin layer: In a large bowl, whisk together 1 can (15 oz / 425g) pumpkin puree, 1 cup (200g) sugar, 1 can (12 oz / 355ml) evaporated milk, 3 eggs, 2 tsp pumpkin pie spice, 1/2 tsp salt, and 1 tsp vanilla extract. Mix until smooth—no lumps! If you see streaks of egg, keep whisking.
Prep note: The mixture should look creamy and slightly thick, with a deep orange color. - Pour into pan: Pour the pumpkin mixture evenly into your greased baking dish. Tap the pan gently on the counter to release air bubbles.
-
Add cake mix: Sprinkle 1 box (15.25 oz / 432g) yellow cake mix evenly over the pumpkin layer. Use your hands or a spoon to distribute it—don’t stir or mix!
Tip: If you want a more even topping, use a fork to gently break up any clumps. - Top with nuts: Sprinkle 1 cup (120g) chopped pecans or walnuts over the cake mix. (Optional, but gives that perfect crunch.)
-
Drizzle with butter: Slowly pour 3/4 cup (170g) melted unsalted butter over the top. Try to cover as much of the cake mix as possible—this helps it bake up golden and crispy.
Warning: Dry spots can happen if you miss a section. If you notice some floury areas after baking, just brush with a little extra melted butter. -
Bake: Place in the oven and bake for 50-60 minutes, until the top is golden brown and the edges are bubbling. (Check at 45 minutes—every oven is a little different!) The cake should feel firm and set in the middle, not jiggly.
Sensory cue: The kitchen will smell like spiced pumpkin heaven, and the top will look crisp with little pools of butter. - Cool: Let the cake cool for at least 30 minutes before serving. This helps the pumpkin layer set and makes slicing easier.
-
Make whipped topping: In a chilled mixing bowl, whip 2 cups (480ml) heavy cream, 1/4 cup (30g) powdered sugar, and 1 tsp vanilla extract until stiff peaks form (about 3-5 minutes with a mixer). Taste and adjust sweetness if needed.
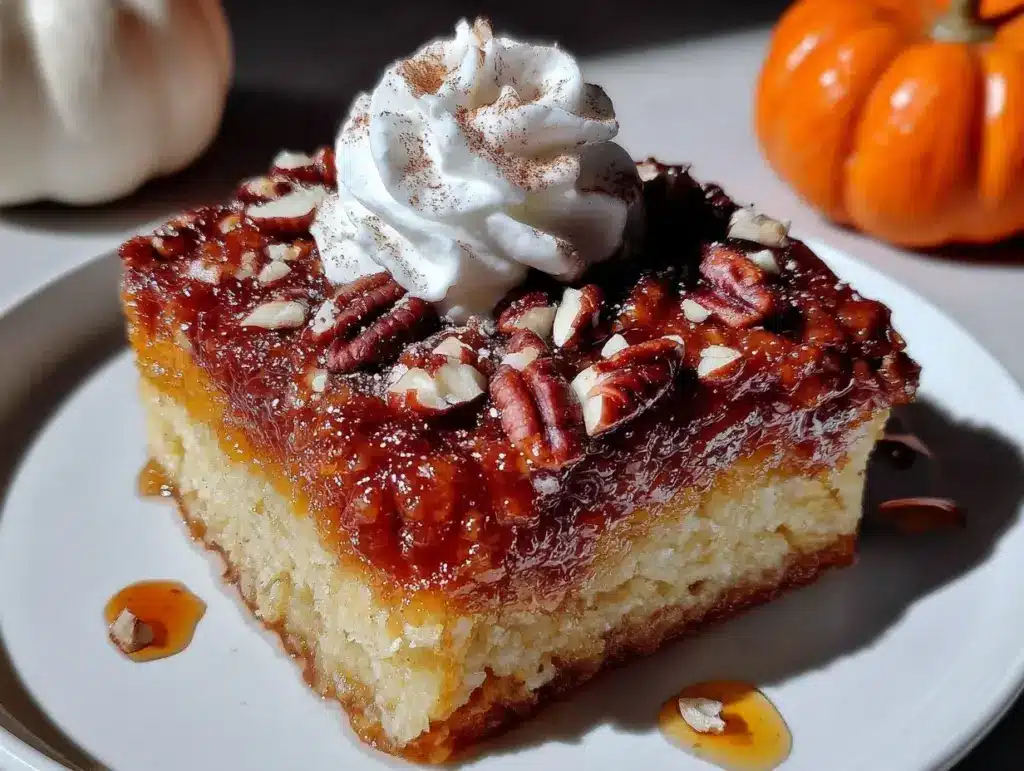
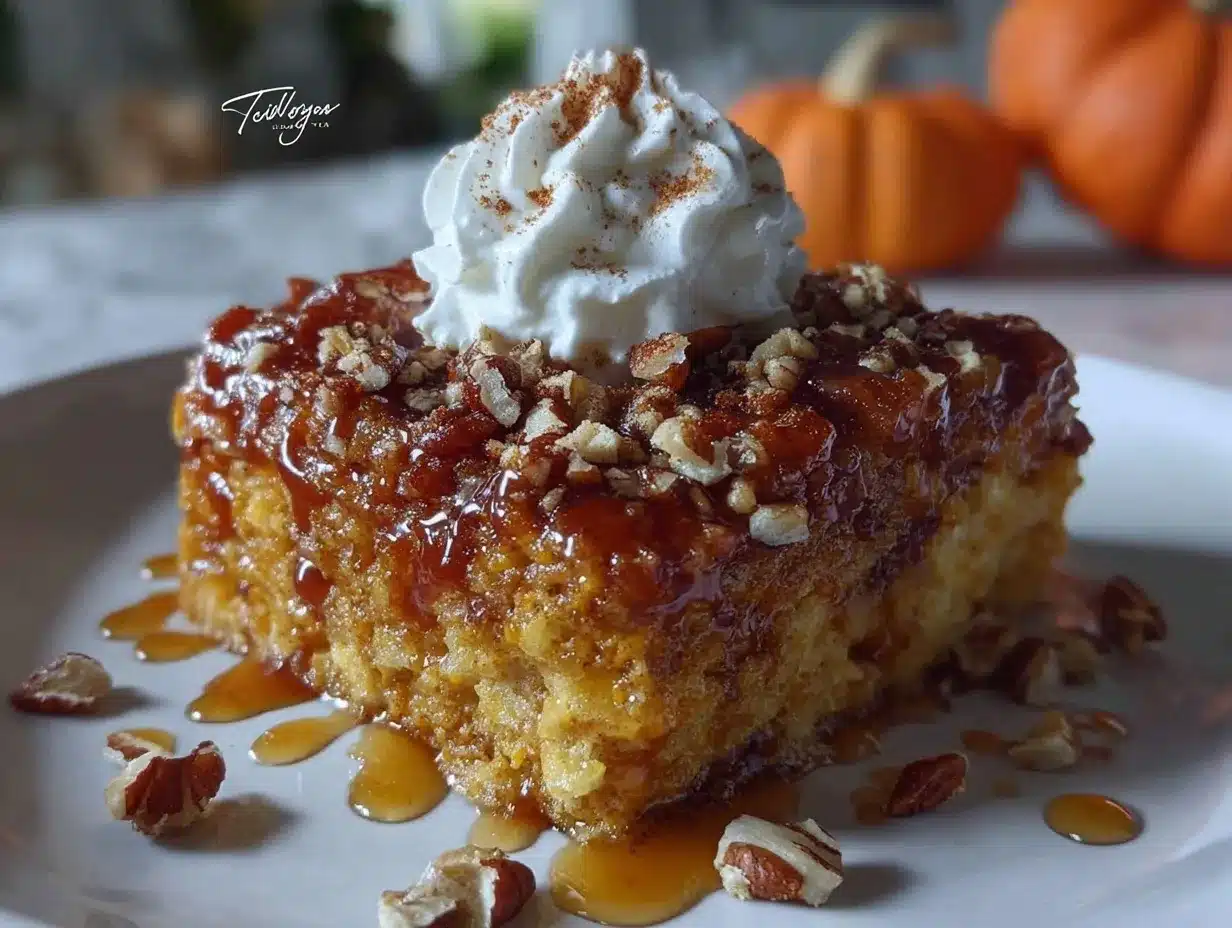
Tip: Don’t over-whip, or it’ll turn grainy. If you do, add a splash of cream and gently re-whip. - Serve: Slice the cooled dump cake and top with a generous dollop of whipped cream. Sprinkle with cinnamon or extra nuts if you’re feeling fancy.
Troubleshooting tip: If your cake is still wet after baking, give it an extra 5-10 minutes. Ovens can be quirky—just keep an eye on the edges for that perfect golden finish. For best results, use room temperature eggs and cold cream. If you’re in a hurry, store-bought whipped topping works fine, but homemade is worth it!
Cooking Tips & Techniques
Making pumpkin dump cake is pretty forgiving, but here are a few pro tips that make all the difference:
- Distribute butter evenly: Drizzle slowly and try not to miss any spots to avoid floury patches. If you spot a dry area after baking, a quick brush with melted butter fixes it right up.
- Don’t over-mix: Resist the urge to stir the cake mix into the pumpkin layer. The magic happens when the layers bake separately!
- Use cold cream for whipping: Cold cream whips faster and holds its shape better. If you’re hand-whisking, chill your bowl and whisk for speed.
- Watch the bake time: Every oven is different. I learned the hard way—burnt edges are a bummer. Start checking at 45 minutes and look for golden brown, not deep brown.
- Don’t skip cooling: It’s tempting to dig in right away, but letting the cake set gives you cleaner slices and perfect layers.
- Multitasking tip: While the cake bakes, whip up your topping and set the table. You’ll feel like a kitchen wizard!
- Consistency matters: Use room temperature eggs for a silky pumpkin layer. If your filling looks curdled, keep whisking until smooth.
One time, I forgot the salt and wondered why the flavor was off—don’t skip the salt! It makes the pumpkin pop. If you end up with a soggy bottom, try baking on the lower oven rack next time. Honestly, most mistakes are fixable; just tastes test and adjust as you go.
Variations & Adaptations
Pumpkin dump cake is super customizable—here are some fun ways to make it your own:
- Gluten-Free: Use your favorite gluten-free yellow cake mix. I’ve tried King Arthur’s—works like a charm!
- Dairy-Free: Swap evaporated milk for oat or almond milk, and use coconut cream for the topping. Earth Balance works well for the butter.
- Nut-Free: Simply leave out the pecans or walnuts. For crunch, add crushed graham crackers or pumpkin seeds instead.
- Flavor Twists: Try spice cake mix for more autumn oomph, or add 1/2 cup mini chocolate chips to the topping for a sweet surprise.
- Seasonal Adaptation: In spring, swap pumpkin puree for mashed sweet potato or butternut squash. Summer calls for a handful of fresh berries on top after baking.
- Personal favorite: I once added a swirl of caramel sauce before baking—total game-changer! It was gone in minutes.
If you love extra spice, double the cinnamon or toss a pinch of cardamom into the pumpkin mix. For a lighter take, use reduced sugar or a sugar alternative—Swerve works well for baking. Honestly, this recipe is like a blank canvas, so don’t be shy about experimenting!
Serving & Storage Suggestions
Pumpkin dump cake tastes best served slightly warm or at room temperature. Top each slice with a cloud of whipped topping right before serving for the prettiest presentation—sprinkle cinnamon or nutmeg on top for extra flair.
Pair this cozy dessert with a mug of hot apple cider, pumpkin spice latte, or simple vanilla ice cream. It’s a perfect finish for Thanksgiving dinner or any fall gathering.
For storing, cover leftovers tightly with plastic wrap or a lid and refrigerate for up to 4 days. The flavor actually deepens by the next day, and the topping stays creamy. For longer storage, slice and freeze individual portions in airtight containers for up to 2 months. To reheat, microwave a slice for 15-20 seconds or warm in a 300°F (150°C) oven for 10 minutes—just hold off on whipped topping until serving.
One tip: the pumpkin layer stays moist, so don’t be surprised if it’s even better the next morning. If you plan to transport, bake in a disposable pan for easy sharing. Honestly, this dessert goes fast, so stash a secret slice for yourself!
Nutritional Information & Benefits
Here’s a quick look at what you’re enjoying:
- Estimated per serving (1/12th of cake): 320 calories, 18g fat, 38g carbohydrates, 4g protein.
- Key health benefits: Pumpkin is packed with Vitamin A, fiber, and antioxidants. Using real pumpkin puree gives you a boost of nutrients and that signature fall flavor.
- Dietary notes: Can be made gluten-free and dairy-free with simple swaps. Contains eggs, milk, and nuts (if used), so watch out for allergens.
From a wellness perspective, I love that you can tweak the sugar and use lighter toppings. Pumpkin’s fiber keeps you satisfied, and homemade whipped cream avoids extra additives. Of course, it’s dessert—best enjoyed in moderation and with a smile!
Conclusion
This pumpkin dump cake recipe truly delivers—cozy flavors, creamy whipped topping, and just the right amount of sweetness. It’s quick to make and always gets rave reviews, whether you’re serving guests or just treating yourself.
Don’t be afraid to customize it—swap nuts, tweak the spices, or try a different cake mix until it’s your perfect fall dessert. Personally, it’s the kind of recipe I return to year after year, especially when I want that “wow” factor without the stress.
If you love easy, comforting sweets, give this pumpkin dump cake a try! Share your version in the comments, or pin it for later so you don’t forget. Let me know if you find a new favorite twist—I love hearing what works in your kitchen. Here’s to cozy desserts and happy baking!
FAQs
Can I make pumpkin dump cake ahead of time?
Absolutely! Bake the cake, let it cool, then cover and refrigerate. Add whipped topping just before serving for best texture.
Can I use pumpkin pie filling instead of puree?
I wouldn’t recommend it—pumpkin pie filling is already spiced and sweetened, which can make the cake too sweet and change the texture. Stick with pure pumpkin puree.
What’s the best way to reheat leftovers?
Microwave individual slices for about 20 seconds, or warm the whole pan in a low oven (300°F/150°C) for 10 minutes. Add whipped topping after reheating.
Can I freeze pumpkin dump cake?
Yes! Slice and freeze in airtight containers for up to 2 months. Thaw overnight in the fridge, and add whipped topping before serving.
How do I make dairy-free whipped topping?
Use chilled coconut cream with a little powdered sugar and vanilla. Whip until fluffy—so easy and delicious!
Pin This Recipe!
Pumpkin Dump Cake Recipe: Easy Cozy Fall Dessert with Whipped Topping

This pumpkin dump cake is a quick and easy fall dessert featuring a creamy spiced pumpkin layer, buttery cake topping, and homemade whipped cream. Perfect for gatherings, potlucks, or a comforting treat at home.
- Prep Time: 15 minutes
- Cook Time: 50-60 minutes
- Total Time: 1 hour 15 minutes
- Yield: 12 servings 1x
- Category: Dessert
- Cuisine: American
Ingredients
- 1 (15 oz) can pure pumpkin puree (not pumpkin pie filling)
- 1 cup granulated sugar (or light brown sugar)
- 1 (12 oz) can evaporated milk (or substitute whole milk)
- 3 large eggs, room temperature
- 2 teaspoons pumpkin pie spice (or 1 tsp cinnamon + 1/2 tsp nutmeg + 1/2 tsp ginger)
- 1/2 teaspoon salt
- 1 teaspoon vanilla extract
- 1 box (15.25 oz) yellow cake mix (or spice cake mix)
- 3/4 cup unsalted butter, melted
- 1 cup chopped pecans or walnuts (optional)
- 2 cups heavy whipping cream, cold
- 1/4 cup powdered sugar
- 1 teaspoon vanilla extract
Instructions
- Preheat oven to 350°F (175°C). Grease a 9×13-inch baking dish with butter or nonstick spray.
- In a large bowl, whisk together pumpkin puree, sugar, evaporated milk, eggs, pumpkin pie spice, salt, and vanilla extract until smooth.
- Pour the pumpkin mixture evenly into the prepared baking dish. Tap gently to release air bubbles.
- Sprinkle the cake mix evenly over the pumpkin layer. Do not stir.
- Sprinkle chopped pecans or walnuts over the cake mix (optional).
- Drizzle melted butter evenly over the top, covering as much of the cake mix as possible.
- Bake for 50-60 minutes, until the top is golden brown and the edges are bubbling. Check at 45 minutes.
- Let the cake cool for at least 30 minutes before serving.
- In a chilled mixing bowl, whip heavy cream, powdered sugar, and vanilla extract until stiff peaks form (about 3-5 minutes).
- Slice the cooled dump cake and top with whipped cream. Sprinkle with cinnamon or extra nuts if desired.
Notes
For gluten-free, use a GF cake mix. Dairy-free options include oat or almond milk and coconut cream for topping. Nuts are optional; substitute with chocolate chips or pumpkin seeds for crunch. Let cake cool before slicing for best texture. Store leftovers covered in the fridge for up to 4 days or freeze for up to 2 months.
Nutrition
- Serving Size: 1/12th of cake
- Calories: 320
- Sugar: 28
- Sodium: 350
- Fat: 18
- Saturated Fat: 10
- Carbohydrates: 38
- Fiber: 2
- Protein: 4
Keywords: pumpkin dump cake, fall dessert, easy cake, Thanksgiving, whipped topping, potluck, comfort food, pumpkin recipe


