
Let me tell you, the scent of rich chocolate and cool peppermint swirling together in my kitchen is the very definition of holiday magic. The first time I pulled a pan of Peppermint Bark Brownies from the oven, the crackling top and glossy, melted peppermint chips made me stop in my tracks. It was one of those moments where you pause, take a deep breath, and just smile because you know you’re onto something truly special. The chocolate aroma wrapped around me like a cozy blanket—honestly, it feels like pure, nostalgic comfort (especially when the December chill is nipping at your nose).
Years ago, when I was knee-high to a grasshopper, my grandma used to make old-fashioned brownies for every winter party, but she’d always sneak in a few crushed candy canes for a festive crunch. I tried to recreate that same feeling when I stumbled upon the idea of combining classic brownies with the iconic peppermint bark you see everywhere during the holidays. I wish I’d thought of it sooner—the combination is dangerously easy and outrageously tasty! My family couldn’t stop sneaking bites off the cooling rack (and let’s face it, neither could I). You know what? Even my picky cousin declared them “the best brownies ever,” and that’s saying something.
These Peppermint Bark Brownies shine at cookie exchanges, potlucks, or as a sweet treat for your kids after school. They’ll brighten up your Pinterest dessert boards and make you the star of any holiday party. Whether you’re baking for a crowd or just whipping up a batch for a cozy night in, this recipe is the festive twist you didn’t know you needed. I’ve made these more times than I can count—in the name of research, of course—and they’ve officially become a staple for family gatherings, homemade gifts, and those quiet moments when you just need a little pick-me-up. Trust me, you’re going to want to bookmark this one. It’s like a warm hug in brownie form.
Why You’ll Love These Peppermint Bark Brownies
If you’re hunting for a dessert that makes holiday baking a breeze—and tastes like it came straight from a bakery—these Peppermint Bark Brownies are your new go-to. I’ve baked countless batches (seriously, my oven is tired) and tweaked every detail to get the perfect fudgy texture and peppermint crunch. Here’s why they’re a must-bake:
- Quick & Easy: Comes together in under 45 minutes, so you’re not stuck in the kitchen all day. Perfect for last-minute party prep or spontaneous sweet cravings.
- Simple Ingredients: Nothing fancy here. Most ingredients are probably sitting in your pantry right now—no special shopping required!
- Perfect for Holiday Parties: These brownies dazzle at potlucks, cookie swaps, and festive brunches. They’re the kind of treat that disappears from the dessert table first.
- Crowd-Pleaser: Kids, adults, even the “I don’t eat sweets” folks end up reaching for seconds. That’s real-life proof they’re a winner.
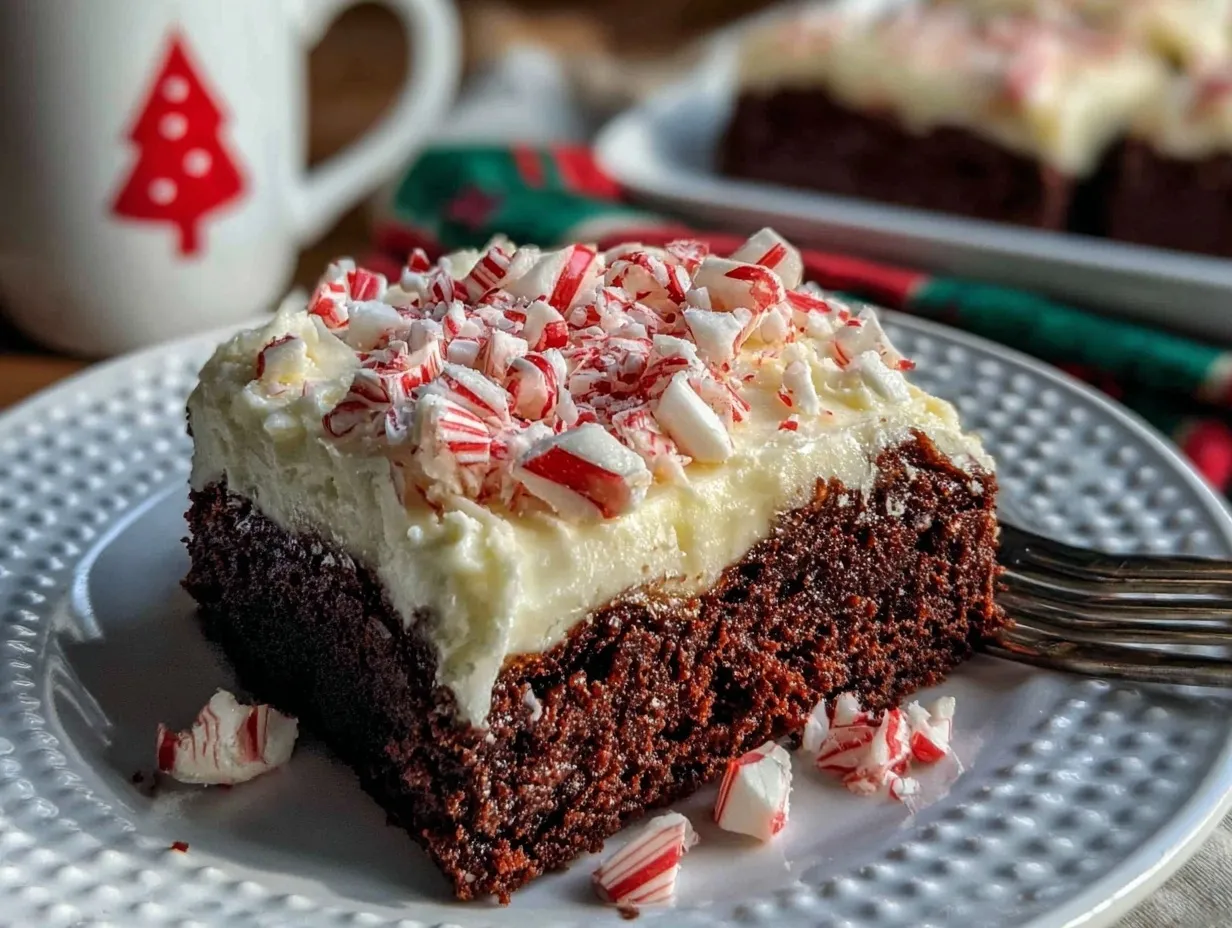
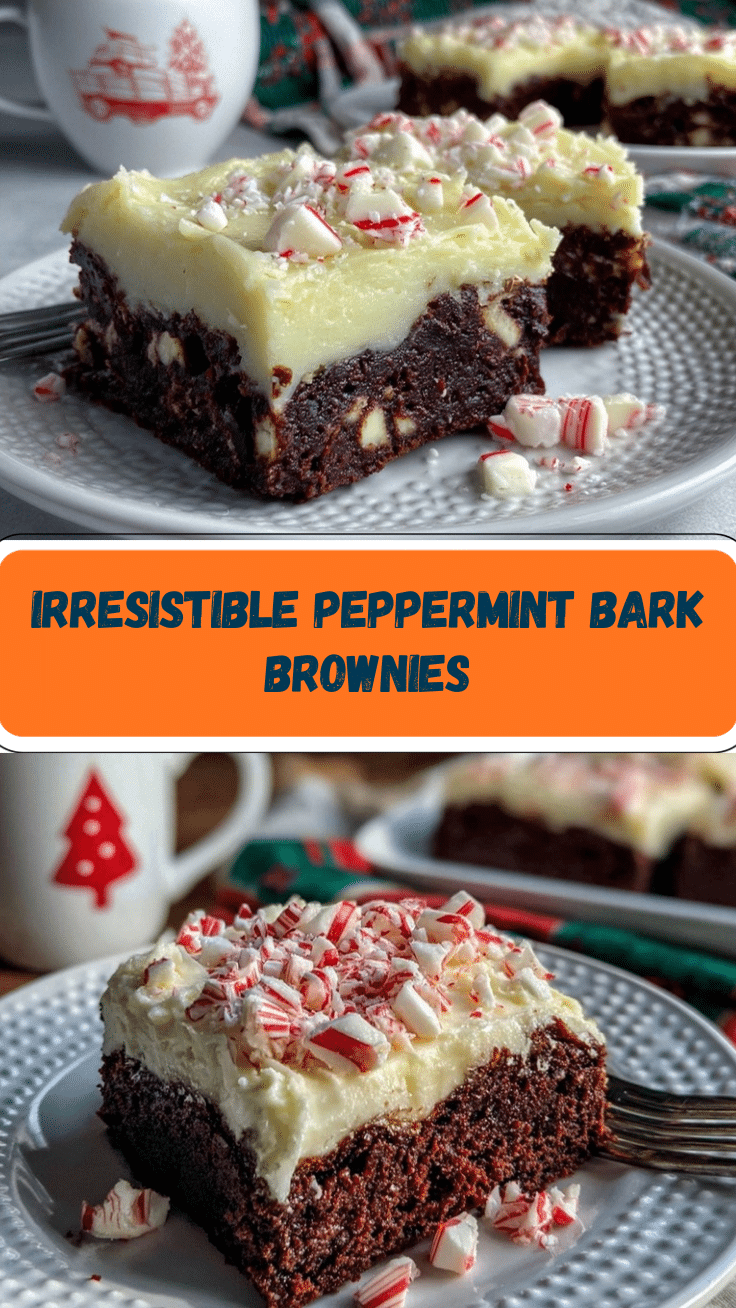
- Unbelievably Delicious: You get the best of both worlds: a gooey brownie base topped with creamy white chocolate and crunchy peppermint bark. Every bite is a party in your mouth.
What sets these apart? I use a trick I learned as a pastry chef—melting both semisweet and dark chocolate for depth, plus a splash of peppermint extract in the batter (not just the topping). That way, every bite is infused with cool peppermint flavor, not just the top layer. Sometimes I’ll even swirl in crushed peppermint candies for extra crunch! You won’t find that in the boxed mix, you know?
Honestly, these brownies are more than just a festive treat. They’re the kind you close your eyes after tasting, letting the chocolate and peppermint do their dance. You get all the indulgence, but with a fresh twist—lighter, brighter, and easier. Whether you’re aiming to impress guests with zero stress or just want a little holiday comfort, these Peppermint Bark Brownies deliver. They’re holiday joy in every square!
What Ingredients You Will Need
This recipe uses simple, wholesome ingredients to deliver bold flavor and satisfying texture without the fuss. Most are pantry staples, and there’s plenty of room for easy substitutions (in case you run out of something or want to tweak for dietary needs).
- For the Brownie Base:
- 1/2 cup (115g) unsalted butter, melted (adds richness)
- 4 oz (115g) semisweet chocolate, chopped (I like Ghirardelli for a smooth melt)
- 3/4 cup (150g) granulated sugar
- 1/4 cup (50g) light brown sugar (for extra chewiness)
- 2 large eggs, room temperature
- 2 tsp peppermint extract (don’t sub with mint—it’s not the same!)
- 1 tsp vanilla extract
- 1/2 cup (65g) all-purpose flour (can sub with gluten-free blend)
- 1/4 cup (25g) unsweetened cocoa powder (Dutch-process gives deeper flavor)
- 1/2 tsp fine sea salt
- For the Peppermint Bark Topping:
- 6 oz (170g) white chocolate chips or chopped white chocolate (I recommend Guittard or Callebaut for best texture)
- 1/2 cup (80g) peppermint chips or crushed candy canes (about 4 large)
- 2 oz (60g) semisweet chocolate, melted (optional drizzle for extra flair)
- Optional Add-Ins & Substitutions:
- Gluten-free flour blend in place of all-purpose for celiac-friendly brownies
- Dairy-free butter and vegan chocolate for plant-based bakers
- Swap brown sugar for coconut sugar if you want a subtle caramel note
- Add 1/3 cup chopped walnuts or pecans for extra crunch
- Use milk chocolate chips instead of semisweet for a sweeter twist
A quick tip: If you want a more pronounced peppermint flavor, sprinkle a little extra peppermint extract over the baked brownies before adding the bark topping. And when choosing white chocolate, look for real cocoa butter in the ingredient list—it melts smoother and tastes creamier.
Equipment Needed
- 8×8-inch (20×20 cm) baking pan (nonstick or metal is best for even baking)
- Parchment paper for easy removal (makes cleanup a breeze)
- Microwave-safe bowls (for melting butter and chocolate)
- Whisk and rubber spatula (a whisk helps blend the eggs perfectly; spatula scrapes every last bit of batter)
- Measuring cups and spoons (accuracy matters for fudgy brownies)
- Small offset spatula or butter knife (to spread the topping evenly)
- Cooling rack (if you want neat squares, cooling is key)
If you don’t have a metal pan, a glass one works—just lower the oven temp by 25°F (about 15°C) since glass heats up slower. I’ve baked these in disposable foil pans for easy gifting, too. And if your microwave is on the fritz, you can melt butter and chocolate together over a double boiler (just takes a bit longer, but works just fine). For maintenance, wash utensils soon after, since dried chocolate is a bear to scrub off. For budget-friendly options, those basic grocery-store spatulas honestly do the job well enough—no need to splurge!
Preparation Method
-
Preheat the Oven:
Set your oven to 350°F (175°C). Line an 8×8-inch (20×20 cm) pan with parchment paper, leaving a slight overhang for easy lifting. This step makes the brownies come out clean every time. -
Melt the Chocolate & Butter:
Combine 1/2 cup (115g) unsalted butter and 4 oz (115g) semisweet chocolate in a microwave-safe bowl. Microwave in 30-second bursts, stirring in between, until smooth and glossy. (If it looks grainy, keep stirring—it’ll come together!) Let cool for 5 minutes. -
Mix Wet Ingredients:
Whisk together 2 large eggs, 3/4 cup (150g) granulated sugar, and 1/4 cup (50g) light brown sugar until pale and slightly thickened (about 2 minutes). Add 2 tsp peppermint extract and 1 tsp vanilla extract. Whisk until just combined. -
Combine Wet and Chocolate Mixtures:
Slowly pour the cooled chocolate-butter mixture into the egg-sugar bowl, whisking as you go. Mix until everything is smooth and uniform. If the batter seems separated, just keep whisking—trust me, it’ll come together. -
Add Dry Ingredients:
Sift 1/2 cup (65g) all-purpose flour, 1/4 cup (25g) unsweetened cocoa powder, and 1/2 tsp sea salt over the wet mixture. Fold gently with a rubber spatula—don’t overmix, or your brownies could turn cakey. The batter should look thick and glossy. -
Pour & Smooth:
Pour the brownie batter into your prepared pan. Use an offset spatula or the back of a spoon to smooth the top evenly. If you’re adding nuts or extra peppermint bits, sprinkle them on now. -
Bake:
Bake on the center rack for 22–26 minutes. When ready, a toothpick inserted in the center should come out with moist crumbs (not wet batter). The surface may crack slightly—that’s a good sign for fudgy brownies! If the edges pull away, remove from oven immediately. -
Cool Completely:
Place the pan on a cooling rack and let the brownies cool for at least 30 minutes. If you rush this, the topping can melt into the base (learned that the hard way). -
Make the Peppermint Bark Topping:
Melt 6 oz (170g) white chocolate in a microwave-safe bowl, stirring every 20 seconds. Pour over cooled brownies, spreading quickly with an offset spatula. Sprinkle 1/2 cup (80g) peppermint chips or crushed candy canes evenly on top. -
Add Chocolate Drizzle (Optional):
Melt 2 oz (60g) semisweet chocolate and drizzle over the bark layer for a fancy look. Use a fork for thin stripes or a spoon for bold swirls. Let set at room temperature, or chill for 10 minutes if you’re impatient. -
Slice & Serve:
Lift brownies from the pan using the parchment overhang. Cut into 16 squares with a sharp knife, wiping between slices for clean edges. The peppermint bark should crunch, and the brownie base should be dense and fudgy.
Troubleshooting tip: If the white chocolate seizes or gets lumpy, add 1/2 tsp coconut oil to smooth it out. If brownies seem underdone, just let them cool completely—they firm up as they sit. For efficiency, prep your toppings while the brownies bake, and clean as you go (makes the process way less chaotic).
Cooking Tips & Techniques
Over the years, I’ve picked up a few tricks to make Peppermint Bark Brownies turn out perfectly, every single time. Here are my best tips:
- Don’t Overbake: The difference between fudgy and dry brownies is just a few minutes. Pull them out when the edges firm up and the center jiggles slightly. They’ll finish setting as they cool.
- Room Temperature Ingredients: Eggs blend better and sugar dissolves evenly if you let them sit out for 30 minutes before baking. Cold eggs can cause a streaky batter.
- Sharp Knife for Slicing: For clean squares, run a sharp knife under hot water, wipe dry, and slice. The peppermint bark can shatter if you rush it, so go slow.
- White Chocolate Melting: Use low power in the microwave and stir every 20 seconds. If you blast it, white chocolate burns fast (trust me, I’ve ruined more than one batch this way).
- Pan Prep: Always use parchment paper—it saves you from a stuck-on mess and gives those neat edges Pinterest loves.
- Multitasking: While brownies bake, prep toppings and wash up. You’ll be ready to assemble as soon as they’re cool, and cleanup’s a breeze.
I’ve had my fair share of flat, cakey brownies and seized chocolate bark. The best fixes? Don’t skip cooling, and don’t rush the melting steps. Consistency is all about gentle mixing and careful timing. If you’re doubling the recipe for a party, use a 9×13 pan and add 5 minutes to the bake time. It’s a foolproof way to scale up for a crowd.
Variations & Adaptations
Here’s where you can have a little fun and make these Peppermint Bark Brownies your own. I’ve tried (and loved) all sorts of tweaks over the years:
- Gluten-Free Version: Swap the all-purpose flour for a trusted 1:1 gluten-free blend like Bob’s Red Mill. I’ve made these for celiac friends, and they’re just as fudgy.
- Vegan Brownies: Use dairy-free butter, flax eggs (1 tbsp ground flax + 2.5 tbsp water per egg), and vegan chocolate chips. The flavor holds up, and the texture stays moist.
- Double Peppermint: Mix 1/4 cup extra crushed candy canes into the batter for more crunch. Or, swirl peppermint extract into the white chocolate topping for a cool “minty” look.
- Seasonal Fruit Add-In: In the summer, swap peppermint for fresh raspberries or dried cranberries. It’s a whole new flavor, and the burst of fruit is awesome with chocolate.
- Nutty Crunch: Stir in toasted walnuts or pecans for a heartier brownie. My uncle swears by the walnut version for holiday brunches!
- Different Cooking Methods: Bake in muffin tins for individual brownie cups—reduce bake time to 18 minutes. Great for packing in lunch boxes or gifting.
For allergen-friendly swaps, you can skip nuts and use sunflower seed butter instead of dairy for a nut-free, dairy-free option. I’ve even made a batch with coconut sugar and almond flour for a lower-carb twist. The best part? You can mix and match toppings to suit everyone’s sweet tooth.
Serving & Storage Suggestions
Serve these Peppermint Bark Brownies at room temperature for the perfect contrast between fudgy base and crisp peppermint bark. They look gorgeous on a holiday platter, especially with a sprinkle of extra crushed candy canes on top. For parties, cut into bite-sized squares and arrange with fresh berries or a mug of hot cocoa.
- Pairing Ideas: These brownies go great with coffee, spiced tea, or eggnog. For a festive dessert table, serve alongside gingerbread cookies or cranberry bars.
- Storage: Store in an airtight container at room temperature for up to 4 days. If you want them to last longer, refrigerate for up to a week (just let them come to room temp before serving for best texture).
- Freezing: Freeze individual squares wrapped tightly in plastic wrap and place in a freezer bag. They stay fresh for up to 2 months. Thaw at room temperature, and they taste as good as new.
- Reheating: If you like a warm brownie, microwave for 10-15 seconds (but beware—the peppermint bark might melt a little). I sometimes pop them in a warm oven for 5 minutes for a softer bite.
As the brownies sit, the peppermint flavor deepens, and the bark stays crisp (so they’re even better the next day, in my opinion). Perfect for prepping ahead and gifting!
Nutritional Information & Benefits
These Peppermint Bark Brownies pack about 210 calories per square (based on 16 pieces), with 12g fat, 26g carbs, and 3g protein. They’re a treat, but there are a few upsides worth noting!
- Dark chocolate brings antioxidants and a touch of magnesium—so you can feel good about indulging.
- Peppermint is known for its digestive benefits and festive flavor.
- Substitutions (like almond flour or coconut sugar) make these brownies lower in carbs and suitable for gluten-free diets.
- Allergens: Contains dairy, eggs, wheat, and may have traces of nuts (if added). Be sure to check chocolate chip packaging for allergen statements.
From my wellness perspective, these brownies are a joyful part of balanced holiday eating. Enjoying one or two with friends and family brings happiness—sometimes, that’s the best nutrition of all!
Conclusion
Peppermint Bark Brownies are honestly my favorite holiday treat—fudgy, minty, and always a hit at festive gatherings. There’s something magical about the blend of chocolate and peppermint that feels like a celebration in every bite. Whether you stick to the classic recipe or put your own spin on it, these brownies are worth every minute in the kitchen.
Don’t be afraid to tweak the flavors, swap ingredients, or play with toppings. I love making these for my family, watching their faces light up at the first taste. If you’re searching for a holiday dessert that’s easy, beautiful, and outrageously good, this is the one to try.
I’d love to hear how your batch turns out! Drop a comment with your favorite twist, share on Pinterest, or tag me with your creations. Happy baking—and may your holidays be sweet, cozy, and full of peppermint joy!
Frequently Asked Questions
Can I make these Peppermint Bark Brownies ahead of time?
Absolutely! They actually taste even better the next day as the flavors meld. Just store them in an airtight container at room temp or in the fridge.
How do I keep my peppermint bark from getting soggy?
Let the brownies cool completely before adding the bark. If you add it while warm, the chocolate can melt and get messy. Chilling for a few minutes helps set the topping fast.
Can I freeze Peppermint Bark Brownies?
Yes, these freeze beautifully! Wrap individual squares in plastic wrap and place in a freezer bag. Thaw at room temperature for best texture.
What’s the best way to crush candy canes without making a mess?
Place candy canes in a zip-top bag and gently tap with a rolling pin or the back of a spoon. I do this on a cutting board—saves your counters and keeps the bits contained.
Can I use peppermint oil instead of extract?
Peppermint oil is much stronger than extract. If you use it, start with just 1/4 teaspoon and taste the batter before adding more. Too much can overpower the brownies.
Pin This Recipe!
Peppermint Bark Brownies

Fudgy brownies infused with cool peppermint and topped with creamy white chocolate and crunchy peppermint bark. These easy holiday treats are perfect for festive parties, cookie exchanges, or cozy nights in.
- Prep Time: 15 minutes
- Cook Time: 25 minutes
- Total Time: 45 minutes
- Yield: 16 brownies 1x
- Category: Dessert
- Cuisine: American
Ingredients
- 1/2 cup (115g) unsalted butter, melted
- 4 oz (115g) semisweet chocolate, chopped
- 3/4 cup (150g) granulated sugar
- 1/4 cup (50g) light brown sugar
- 2 large eggs, room temperature
- 2 tsp peppermint extract
- 1 tsp vanilla extract
- 1/2 cup (65g) all-purpose flour
- 1/4 cup (25g) unsweetened cocoa powder
- 1/2 tsp fine sea salt
- 6 oz (170g) white chocolate chips or chopped white chocolate
- 1/2 cup (80g) peppermint chips or crushed candy canes (about 4 large)
- 2 oz (60g) semisweet chocolate, melted (optional drizzle)
Instructions
- Preheat the oven to 350°F (175°C). Line an 8×8-inch pan with parchment paper, leaving an overhang for easy lifting.
- Combine butter and semisweet chocolate in a microwave-safe bowl. Microwave in 30-second bursts, stirring in between, until smooth and glossy. Let cool for 5 minutes.
- Whisk together eggs, granulated sugar, and light brown sugar until pale and slightly thickened (about 2 minutes). Add peppermint extract and vanilla extract. Whisk until just combined.
- Slowly pour the cooled chocolate-butter mixture into the egg-sugar bowl, whisking as you go until smooth and uniform.
- Sift flour, cocoa powder, and sea salt over the wet mixture. Fold gently with a rubber spatula until just combined. The batter should be thick and glossy.
- Pour the batter into the prepared pan and smooth the top evenly. Sprinkle nuts or extra peppermint bits if desired.
- Bake on the center rack for 22–26 minutes, until a toothpick inserted in the center comes out with moist crumbs. Remove from oven when edges pull away slightly.
- Place the pan on a cooling rack and let the brownies cool for at least 30 minutes.
- Melt white chocolate in a microwave-safe bowl, stirring every 20 seconds. Pour over cooled brownies and spread quickly with an offset spatula. Sprinkle peppermint chips or crushed candy canes evenly on top.
- Melt semisweet chocolate and drizzle over the bark layer for decoration, if desired. Let set at room temperature or chill for 10 minutes.
- Lift brownies from the pan using the parchment overhang. Cut into 16 squares with a sharp knife, wiping between slices for clean edges.
Notes
For gluten-free brownies, substitute a 1:1 gluten-free flour blend. Use dairy-free butter and vegan chocolate for a plant-based version. Let brownies cool completely before adding the bark topping to prevent melting. Store in an airtight container at room temperature for up to 4 days or freeze for up to 2 months. For clean slices, use a sharp knife warmed under hot water.
Nutrition
- Serving Size: 1 brownie (1/16 of p
- Calories: 210
- Sugar: 20
- Sodium: 90
- Fat: 12
- Saturated Fat: 7
- Carbohydrates: 26
- Fiber: 2
- Protein: 3
Keywords: peppermint bark brownies, holiday brownies, Christmas dessert, peppermint dessert, fudgy brownies, easy brownies, festive treats, chocolate peppermint


