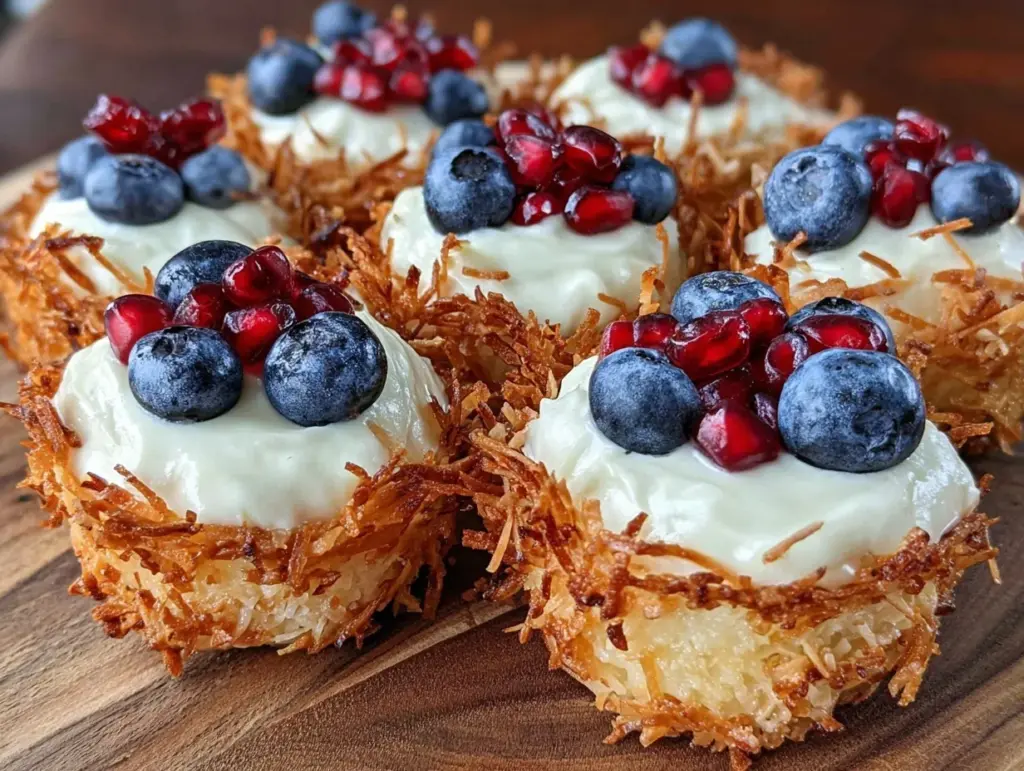
“You’ve got to try these little nests,” my friend whispered across the table last summer, sliding a tiny plate toward me. It was one of those scorching evenings when the idea of turning on the oven felt like pure torture. Honestly, I was skeptical—mini coconut cream nests? No-bake? Could something that simple really taste that good? But one bite and the skepticism melted away like the cool cream on my tongue. These delicate, fluffy nests filled with luscious coconut cream and topped with fresh fruit felt like a secret summer delight, perfect for those moments when you want a treat without the fuss.
I ended up making these Easy No-Bake Mini Coconut Cream Nests several times that week—sometimes as a quick dessert after a long day, other times to surprise guests who walked in unannounced. What I love most is how effortlessly they come together, yet they look like you put in way more work than you actually did. The light coconut flavor and creamy texture make you pause, savor, and yes, close your eyes after the first bite. They’ve stuck around in my rotation, especially when paired alongside savory bites like crispy baked turkey sliders—the combo is unexpectedly perfect.
There’s something comforting about the simplicity here—no complicated baking steps, no long ingredient lists. Just pure summer vibes captured in a bite-sized nest. These little treats have become my go-to answer for when I want to impress without stress, or simply need a small moment of indulgence that feels both fresh and satisfying. And honestly, that quiet moment of sweet coconut cream nestled in a crisp base? It feels like a tiny celebration every time.
Why You’ll Love This Recipe
After making these Easy No-Bake Mini Coconut Cream Nests more times than I can count, I’ve gathered a few reasons why they’re a keeper in my kitchen:
- Quick & Easy: They come together in under 30 minutes, which is perfect for those busy summer afternoons or last-minute dessert emergencies.
- Simple Ingredients: You probably already have most of everything in your pantry or fridge—no fancy trips needed.
- Perfect for Summer: Light, refreshing, and cool, these nests are ideal for pool parties, picnics, or casual get-togethers.
- Crowd-Pleaser: Kids and adults alike rave about the creamy coconut filling paired with the crunchy base.
- Unbelievably Delicious: The balance of creamy, crunchy, and slightly sweet textures makes every bite feel special.
This recipe isn’t just any coconut cream dessert. What sets it apart is the no-bake method that keeps things cool and fuss-free, plus the mini nest shape that’s fun to make and eat. I like to blend the coconut cream filling until ultra-smooth and airy, which feels almost like a cloud on your palate. Also, the base uses toasted coconut flakes mixed with a touch of honey to add a natural crunch and subtle sweetness.
It’s a treat that feels indulgent but doesn’t weigh you down—perfect for those summer afternoons when you want something sweet but light. Plus, if you’re planning a party, these pair wonderfully with easy appetizers like crunchy taco cups to keep things balanced and fun.
What Ingredients You Will Need
This recipe uses simple, wholesome ingredients to deliver bold flavor and satisfying texture without the fuss. Most are pantry staples, and a few fresh touches make all the difference.
- For the Nest Base:
- Toasted coconut flakes (about 1 ½ cups / 135g) – I prefer unsweetened for a natural flavor, but sweetened works too
- Honey (2 tablespoons / 30ml) – adds natural sweetness and helps bind the base
- Chopped nuts (optional, ¼ cup / 30g) – toasted almonds or pecans add extra crunch
- Vanilla extract (1 teaspoon / 5ml) – gives a warm, inviting aroma
- Pinch of sea salt – balances sweetness
- For the Coconut Cream Filling:
- Full-fat coconut milk (1 can, 13.5 oz / 400ml) – chilled overnight so the cream separates
- Powdered sugar (3 tablespoons / 24g) – for smooth sweetness
- Vanilla extract (1 teaspoon / 5ml) – compliments the coconut flavor beautifully
- Lemon juice (1 teaspoon / 5ml) – brightens and balances the creaminess
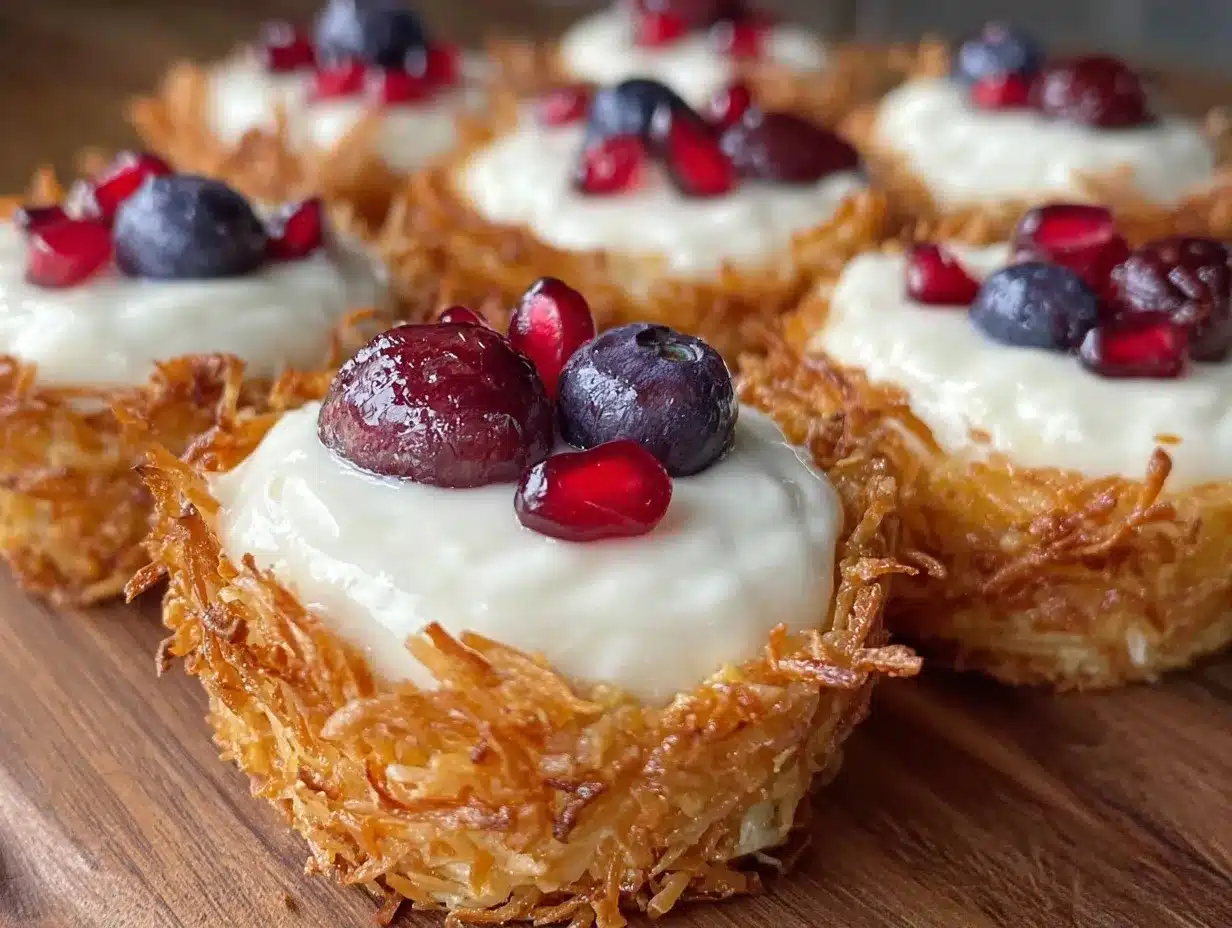
- Toppings:
- Fresh berries like raspberries or blueberries – adds color and tartness
- Toasted coconut flakes for garnish
- Edible flowers (optional) for a pretty touch
For ingredient tips: I like to use Native Forest canned coconut milk because it’s thick and rich, perfect for whipping. When toasting coconut flakes, keep an eye on them so they don’t burn—just a light golden color is ideal. If you want to go dairy-free or vegan, this recipe fits right in since it’s fully plant-based. For a gluten-free twist, the base is naturally free of gluten, making it a safe choice for many diets.
Equipment Needed
- Mixing bowls – one large for the base and one for the coconut cream
- Electric hand mixer or stand mixer – for whipping the coconut cream to fluffy perfection
- Small silicone muffin molds or mini tart pans – to shape the coconut nests easily
- Measuring cups and spoons – to get the ingredient quantities just right
- Spatula – for folding and scraping
- Baking sheet (optional) – if you prefer to toast coconut flakes in the oven
If you don’t have silicone molds, small cupcake liners or even mini ramekins work just fine, just be gentle when unmolding. A hand mixer makes whipping coconut cream a breeze; I’ve tried it by hand, but it takes much longer and isn’t as fluffy. For budget-friendly options, look for reusable silicone molds online or at kitchen stores—they last forever and are easy to clean.
Preparation Method
- Toast the Coconut Flakes: Preheat your oven to 350°F (175°C). Spread the coconut flakes evenly on a baking sheet. Toast for 5-7 minutes, stirring halfway, until golden and fragrant. Watch closely to avoid burning. Remove and let cool completely (about 15 minutes).
- Prepare the Nest Base: In a large bowl, combine cooled toasted coconut flakes, honey, chopped nuts (if using), vanilla extract, and a pinch of sea salt. Mix thoroughly with a spatula until all ingredients stick together well. The mixture should hold when pressed.
- Shape the Nests: Spoon about 1 ½ tablespoons (20g) of the base mixture into each cavity of your silicone mold or mini tart pan. Press gently to form a shallow nest shape with a slight indentation in the center. Place the molds on a tray and refrigerate for at least 15 minutes to set.
- Whip the Coconut Cream: Open the chilled coconut milk can without shaking. Scoop out the thick cream that has separated on top into a chilled mixing bowl (save the liquid for smoothies). Add powdered sugar, vanilla extract, and lemon juice. Using an electric mixer, whip on high speed for 3-5 minutes until fluffy and smooth. The texture should be light and hold soft peaks.
- Fill the Nests: Remove the set coconut bases from the fridge. Carefully spoon or pipe the whipped coconut cream into each nest, filling the indentation generously but neatly.
- Garnish and Chill: Top each nest with fresh berries, toasted coconut flakes, or edible flowers. Return to the fridge for 10-15 minutes before serving to blend the flavors and firm up the cream slightly.
- Serve: Gently unmold the nests onto a serving plate. They should hold their shape but be tender and creamy inside. Enjoy chilled for the best experience.
Pro tip: If your coconut cream isn’t whipping well, it might not be cold enough or the can was shaken. Always refrigerate overnight and open carefully. Also, don’t rush the chilling steps—they help the nests hold together beautifully.
Cooking Tips & Techniques
Working with coconut cream can be a little tricky if you’re new to it, but a few tips can make all the difference:
- Chill the coconut milk: This is crucial. Pop the can in the fridge overnight so the cream separates and thickens on top.
- Whip carefully: Use an electric mixer, and don’t get impatient. Whipping too fast or too little can affect texture.
- Toast coconut evenly: Stir the flakes halfway through to avoid hot spots and burning. The golden color is your cue.
- Press the base firmly: When forming the nests, press the coconut mixture well to avoid crumbling later.
- Multitask by chilling: While the nests chill, whip the cream or prep toppings to save time.
One time, I tried sweetening the cream with granulated sugar instead of powdered sugar—big mistake! It never smoothed out and felt grainy. Since then, powdered sugar has been my secret for that silky finish. Also, if your whipped cream starts to separate, a quick gentle fold can bring it back.
Variations & Adaptations
These no-bake mini coconut cream nests are surprisingly versatile. Here are some ways to switch things up:
- Chocolate Coconut Nests: Add 2 tablespoons (15g) of cocoa powder to the base mix for a rich chocolatey twist.
- Berry Medley: Swap fresh berries for mango chunks or kiwi slices for a tropical vibe.
- Nut-Free Version: Skip the nuts in the base and add a tablespoon of chia seeds for crunch instead.
- Low-Sugar Option: Use maple syrup or agave instead of honey and reduce powdered sugar in the cream.
- Mini Pie Variation: Use a store-bought gluten-free graham cracker crust pressed into mini tart pans as the base for an easier shortcut.
Personally, I’ve tried adding a pinch of cinnamon to the base mixture once, and it gave a cozy warmth that was unexpected but delightful. If you’re into experimenting, these nests invite creativity without losing their easy charm.
Serving & Storage Suggestions
Serve these mini nests chilled for the creamiest texture and freshest flavor. They’re perfect as bite-sized desserts at summer parties or as a light finish after a meal. Present them on a pretty platter with a sprinkle of extra toasted coconut flakes and a few fresh berries scattered around.
Pair them with light beverages like iced tea or a crisp white wine for a relaxed vibe. They also make a cute addition alongside savory finger foods like creamy dill pickle cheese balls for a mix of flavors.
Store any leftovers in an airtight container in the refrigerator for up to 2 days. The nests will hold their shape well but may soften slightly over time. If you want to prepare ahead, assemble the bases and whip the cream separately, then fill just before serving for the freshest experience.
When reheating, these are best served cold; warming would melt the cream and ruin the texture. Over time, the flavors meld beautifully, so sometimes I make them a few hours ahead to let the coconut and vanilla mingle.
Nutritional Information & Benefits
Each mini nest contains approximately 120 calories, 8 grams of fat (mostly from healthy coconut fats), and 7 grams of carbohydrates with 3 grams of sugar. They are naturally gluten-free and dairy-free, making them suitable for many dietary needs.
Coconut provides medium-chain triglycerides (MCTs), which some studies suggest can support energy and metabolism. The fresh fruit topping adds antioxidants and vitamins, while the honey offers natural sweetness without refined sugars.
From a wellness perspective, this treat feels indulgent without the heaviness of traditional desserts, making it a lighter option for those mindful of their eating but not willing to sacrifice flavor.
Conclusion
These Easy No-Bake Mini Coconut Cream Nests are proof that complex desserts aren’t always necessary to impress or satisfy. They’re quick, simple, and downright delicious—a sweet spot of creamy, crunchy, and fresh all in one bite. What keeps me coming back is how easily they adapt to whatever’s in my kitchen or the mood I’m in.
Feel free to tweak the toppings or base to match your taste, and don’t hesitate to share this recipe with friends who appreciate fuss-free treats. I love that they bring a little joy and calm to my summer days, and I hope they do the same for you.
After all, sometimes the best recipes are the ones that come together effortlessly but linger in your memory long after the last bite.
Frequently Asked Questions
Can I make the coconut cream nests ahead of time?
Yes! You can prepare the bases and whip the cream separately, then assemble the nests a few hours before serving. Store them covered in the fridge.
What if I can’t find canned coconut milk?
Look for full-fat coconut cream or refrigerated coconut milk in the dairy aisle. Avoid light versions as they won’t whip well.
How do I prevent the nests from falling apart?
Press the base mixture firmly into the molds and chill well before filling. Also, avoid overfilling with cream to keep them stable.
Can I use a different sweetener instead of honey?
Absolutely. Maple syrup or agave nectar work well, but adjust the amount to taste since sweetness levels vary.
Are these nests suitable for kids?
Yes, they’re a kid-friendly treat with natural sweetness and no baking involved, making them safe and fun for little hands to help with.
Pin This Recipe!
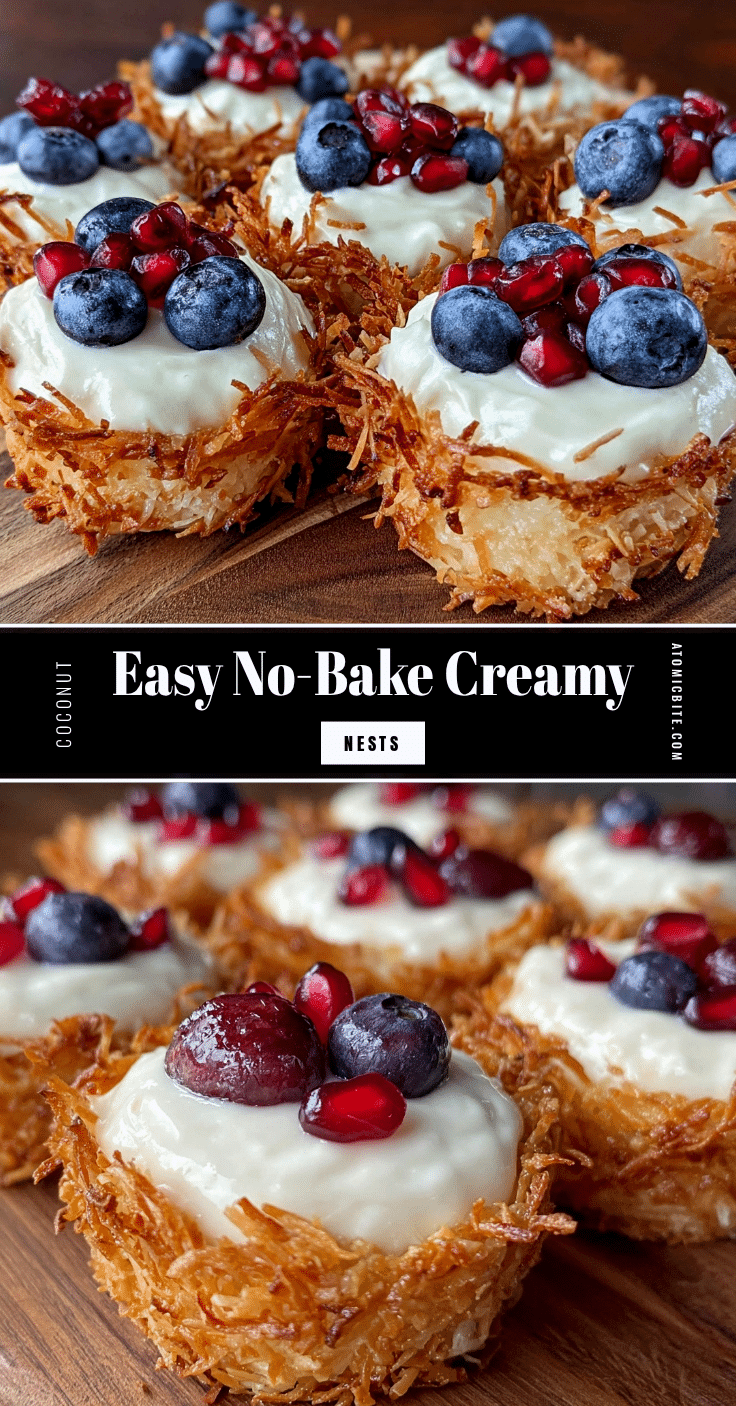
Easy No-Bake Mini Coconut Cream Nests

Delicate, fluffy no-bake mini coconut cream nests filled with luscious coconut cream and topped with fresh fruit, perfect for a light and refreshing summer treat.
- Prep Time: 15 minutes
- Cook Time: 7 minutes
- Total Time: 32 minutes
- Yield: 12 mini nests 1x
- Category: Dessert
- Cuisine: American
Ingredients
- 1 ½ cups (135g) toasted coconut flakes (unsweetened preferred)
- 2 tablespoons (30ml) honey
- ¼ cup (30g) chopped nuts (optional, toasted almonds or pecans)
- 1 teaspoon (5ml) vanilla extract
- Pinch of sea salt
- 1 can (13.5 oz / 400ml) full-fat coconut milk, chilled overnight
- 3 tablespoons (24g) powdered sugar
- 1 teaspoon (5ml) vanilla extract
- 1 teaspoon (5ml) lemon juice
- Fresh berries (raspberries or blueberries) for topping
- Toasted coconut flakes for garnish
- Edible flowers (optional) for garnish
Instructions
- Preheat oven to 350°F (175°C). Spread coconut flakes evenly on a baking sheet and toast for 5-7 minutes, stirring halfway, until golden and fragrant. Let cool completely (about 15 minutes).
- In a large bowl, combine cooled toasted coconut flakes, honey, chopped nuts (if using), vanilla extract, and a pinch of sea salt. Mix thoroughly until the mixture sticks together well.
- Spoon about 1 ½ tablespoons (20g) of the base mixture into each cavity of silicone molds or mini tart pans. Press gently to form shallow nests with a slight indentation. Refrigerate for at least 15 minutes to set.
- Open chilled coconut milk can without shaking. Scoop out the thick cream into a chilled mixing bowl. Add powdered sugar, vanilla extract, and lemon juice. Whip on high speed with an electric mixer for 3-5 minutes until fluffy and smooth with soft peaks.
- Remove set coconut bases from fridge. Spoon or pipe whipped coconut cream into each nest indentation generously but neatly.
- Top each nest with fresh berries, toasted coconut flakes, or edible flowers. Return to fridge for 10-15 minutes before serving.
- Gently unmold nests onto a serving plate. Serve chilled.
Notes
Chill the coconut milk overnight to separate the cream for whipping. Use powdered sugar for smooth sweetness; granulated sugar will cause graininess. Press the base firmly to avoid crumbling. Toast coconut flakes carefully to a light golden color to avoid burning. If coconut cream doesn’t whip well, ensure it is cold and the can was not shaken.
Nutrition
- Serving Size: 1 mini nest
- Calories: 120
- Sugar: 3
- Fat: 8
- Carbohydrates: 7
Keywords: no-bake dessert, coconut cream nests, summer treats, easy dessert, mini coconut nests, gluten-free dessert, dairy-free dessert, vegan dessert


