Introduction
Picture this: the sweet aroma of vanilla and almond swirling through your kitchen, the gentle warmth of the oven, and tiny, golden cakes rising with soft, pillowy tops. I still remember the first time I baked these mini cakes—my kitchen was filled with that unmistakable scent that just makes you want to linger a little longer. There’s something magical about small, perfectly portioned cakes, you know? They look dainty, taste dreamy, and honestly, they’re dangerously easy to love.
The first batch I ever made was for my cousin’s baby shower. I was knee-high to a grasshopper back then and watched my grandma fuss over every detail, piping delicate buttercream swirls like it was the most important job in the world. That was the kind of moment where you pause, take a deep breath, and just smile because you know you’re onto something truly special. Years later, I tried to recreate her mini cakes for a fancy tea party (spoiler: they disappeared faster than you could say “save me one!”).
My family couldn’t stop sneaking them off the cooling rack (and I can’t really blame them). These elegant mini cakes have become a staple for family gatherings, gifting, and, let’s face it, any excuse to indulge. Whether it’s for a Pinterest-worthy dessert table, a sweet treat for your kids, or a showstopper for baby showers, this mini cakes recipe brings pure, nostalgic comfort in a cute, party-ready package. I’ve tested and tweaked the recipe more times than I care to admit—in the name of research, of course—and every time it feels like a warm hug. You’re going to want to bookmark this one!
Why You’ll Love This Mini Cakes Recipe
Let me just say—after years of baking, tweaking, and serving these at countless parties, I can promise you this mini cakes recipe is a crowd-pleaser every single time. There’s something irresistible about a dessert that’s both beautiful and practical. Here’s why you’ll be reaching for this recipe again and again:
- Quick & Easy: Comes together in under 45 minutes, perfect for busy party prep or last-minute dessert emergencies.
- Simple Ingredients: No fancy grocery runs needed—you probably already have everything in your pantry.
- Perfect for Special Occasions: These mini cakes are ideal for baby showers, elegant parties, birthdays, or even afternoon tea.
- Crowd-Pleaser: Kids love the individual servings, adults love the refined look. Always gets rave reviews from every age group.
- Unbelievably Delicious: Ultra-moist crumb, delicate flavor, and a buttery finish that makes you close your eyes with the first bite.
What sets this mini cakes recipe apart? It’s not just another cupcake dressed up as a cake—these are genuinely mini versions of classic layer cakes, with a tender crumb and silky frosting. I use a blend of vanilla and almond extract for that signature flavor, and the texture is perfection thanks to a tried-and-true mixing method (learned from my grandma’s kitchen, no less!). Whether you’re piping rosettes or sprinkling edible flowers, these cakes are a blank canvas for your creativity.
Honestly, there’s a comfort in knowing you can whip these up without breaking a sweat. They’re elegant enough to impress your guests but simple enough that you won’t be glued to the kitchen all day. If you’re after a recipe that brings joy, beauty, and a little “wow” to your table, these mini cakes are it. The kind of dessert that makes memories and turns any gathering into something memorable.
What Ingredients You Will Need
This mini cakes recipe uses simple, wholesome ingredients to deliver bold flavor and satisfying texture without the fuss. Most of these are pantry staples, so no wild goose chase at the grocery store. Here’s what you’ll need:
- For the cakes:
- All-purpose flour – 2 cups (240g) (provides structure; you can use cake flour for extra tenderness)
- Granulated sugar – 1 cup (200g) (for sweetness and moisture)
- Unsalted butter – 1/2 cup (115g), softened (adds richness; I recommend Kerrygold for best flavor)
- Baking powder – 1 1/2 teaspoons (ensures a good rise)
- Baking soda – 1/2 teaspoon (balances acidity, helps with browning)
- Salt – 1/4 teaspoon (just a pinch to brighten flavors)
- Large eggs – 2, room temperature (for binding and richness)
- Whole milk – 1 cup (240ml), room temperature (can substitute almond or oat milk for dairy-free)
- Vanilla extract – 1 1/2 teaspoons (key for flavor)
- Almond extract – 1/2 teaspoon (optional, but gives a lovely bakery-style touch)
- For the frosting:
- Unsalted butter – 1/2 cup (115g), softened
- Powdered sugar – 2 cups (240g), sifted (for smoothness)
- Whole milk or cream – 2-3 tablespoons (30-45ml) (adjust for desired consistency)
- Vanilla extract – 1 teaspoon
- Pinch of salt
- Decorations (optional but fun):
- Edible flowers (for a Pinterest-worthy finish)
- Fresh berries (like raspberries or blueberries)
- Sprinkles or colored sugar
- Mini chocolate curls
If you want a gluten-free option, swap in a 1:1 gluten-free flour blend. For vegan mini cakes, use plant-based milk and a vegan butter substitute (Earth Balance is my go-to). In summer, I love adding a splash of lemon zest or topping with seasonal berries. You can tweak the extracts—try orange or coconut for a twist. Honestly, these ingredients are flexible, so don’t stress if you need to make a quick swap. The results will still be delicious!
Equipment Needed
You don’t need a fancy kitchen to make these mini cakes—just a few reliable tools. Here’s what I use every time:
- Mini cake pans or a muffin tin (standard 12-cup size works great; I like Wilton’s nonstick pans for easy release)
- Mixing bowls – at least two (one for wet, one for dry ingredients)
- Electric hand mixer or stand mixer (whisking by hand works, but a mixer saves time and effort)
- Measuring cups and spoons (accuracy matters for baking!)
- Rubber spatula (for scraping every last bit of batter)
- Wire cooling rack (helps prevent soggy bottoms)
- Piping bags and tips (if you want to decorate with fancy frosting swirls—zip-top bags work in a pinch)
- Offset spatula or butter knife (for spreading frosting)
If you don’t have mini cake pans, muffin tins are your best bet. I’ve even used silicone molds—super easy to clean and no sticking. Maintenance tip: always let pans cool before washing to avoid warping. For budget-friendly options, basic aluminum pans work just fine. I’ve baked these cakes in everything from thrift-store finds to high-end pans, and honestly, the results are always worth it.
Preparation Method
- Preheat and Prep: Preheat your oven to 350°F (175°C). Lightly grease your mini cake pans or muffin tin with nonstick spray or a thin layer of butter. If using paper liners, set them in place. This helps with easy removal and cleanup.
- Combine Dry Ingredients: In a medium bowl, whisk together 2 cups (240g) all-purpose flour, 1 cup (200g) granulated sugar, 1 1/2 teaspoons baking powder, 1/2 teaspoon baking soda, and 1/4 teaspoon salt. Make sure there are no lumps—sifting helps if your flour is packed.
- Cream Butter and Sugar: In a large mixing bowl, beat 1/2 cup (115g) unsalted butter until smooth and creamy—about 2-3 minutes. Add the dry mixture slowly, blending just until crumbly. Then, add the eggs one at a time, mixing well after each addition. The batter should be pale and fluffy.
- Add Wet Ingredients: Mix in 1 cup (240ml) whole milk, 1 1/2 teaspoons vanilla extract, and 1/2 teaspoon almond extract. Beat on low speed until everything is well combined—don’t overmix, or the cakes can turn chewy instead of tender. The batter will look thick but pourable.
- Fill and Bake: Spoon the batter into your prepared pans, filling each cup about 2/3 full. This gives the cakes room to rise without overflowing. Bake for 15-18 minutes, or until the tops are golden and a toothpick inserted in the center comes out clean. (A little crumb is okay—just not wet batter.)
- Cool Completely: Let the cakes cool in the pan for 5 minutes, then transfer to a wire rack. If you rush this step, the cakes can break apart—patience pays off!
- Make the Frosting: Beat 1/2 cup (115g) butter until light and fluffy. Gradually add 2 cups (240g) powdered sugar, 2-3 tablespoons (30-45ml) milk, 1 teaspoon vanilla, and a pinch of salt. Mix on high speed for 2-3 minutes until smooth and spreadable. If it’s too stiff, add a splash more milk; if too runny, add a spoonful of sugar.
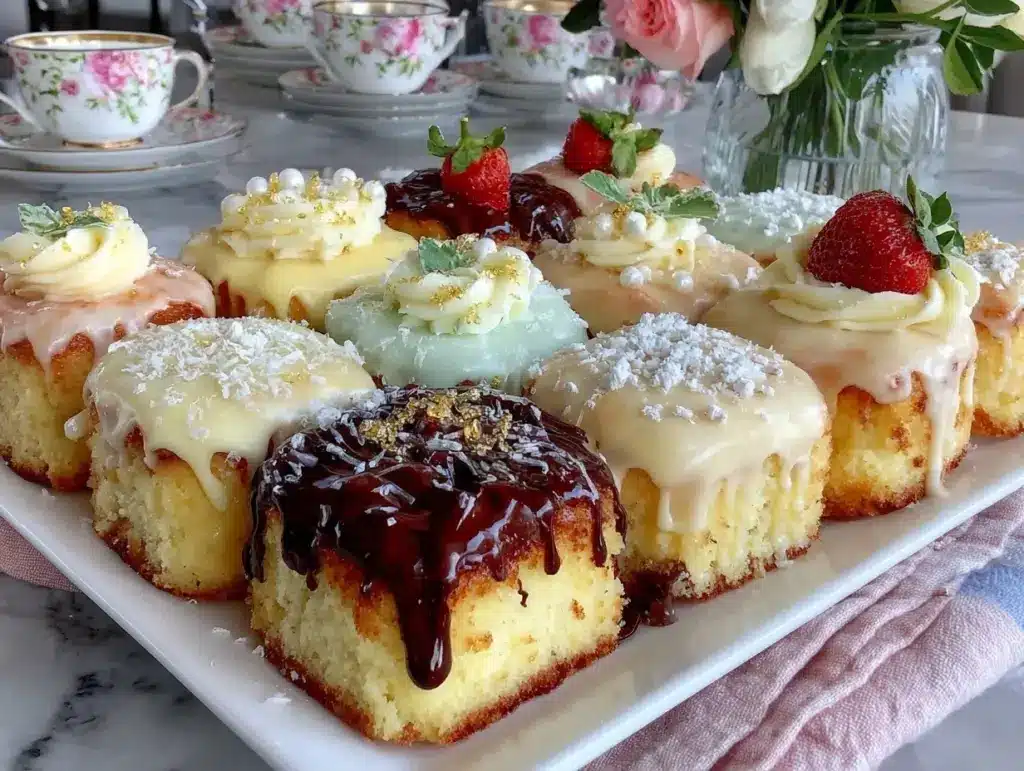
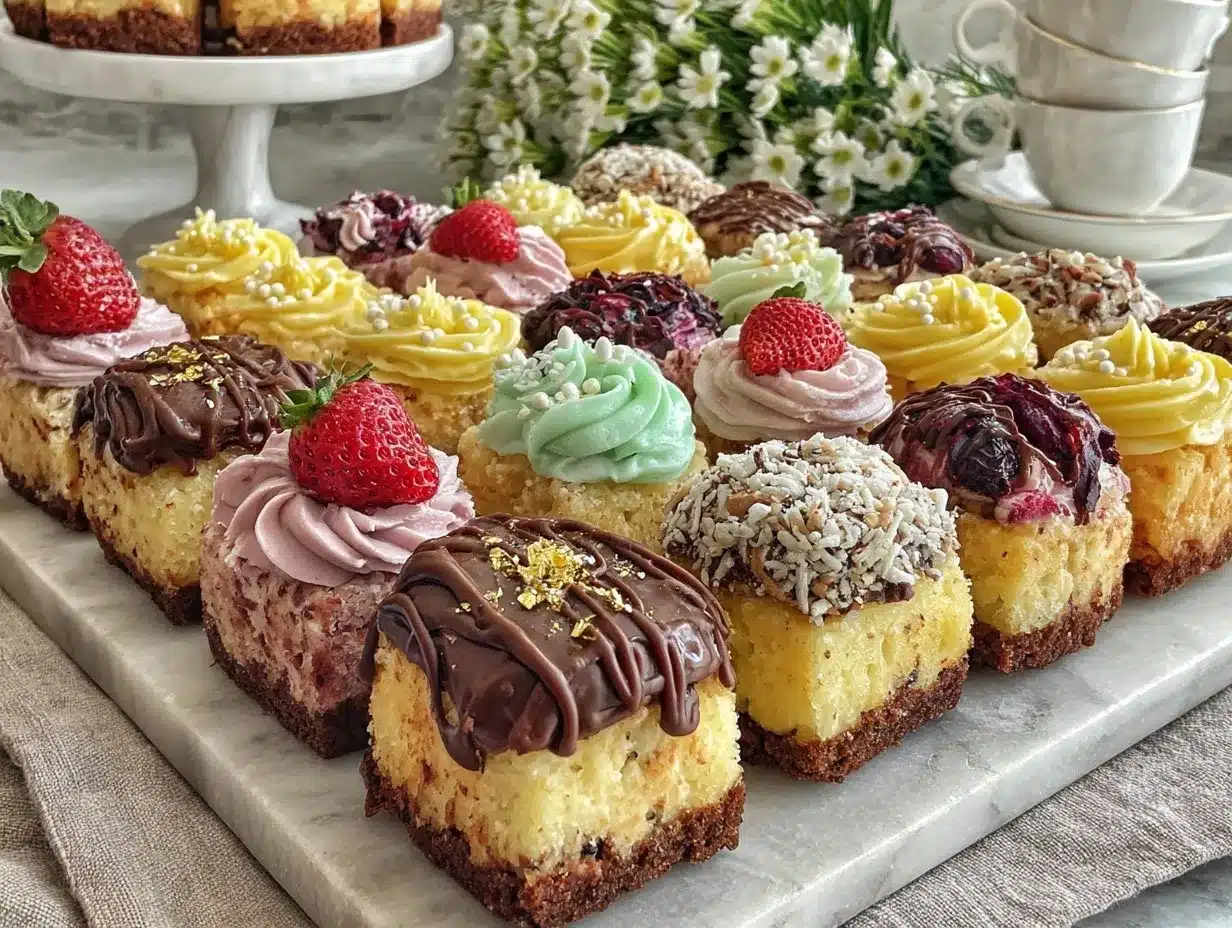
- Decorate: Once cakes are completely cool, pipe or spread frosting onto each. Top with edible flowers, fresh berries, sprinkles, or mini chocolate curls. If you want sharp edges, use an offset spatula and chill the decorated cakes for 10 minutes before serving.
- Troubleshooting Tips: If cakes sink in the middle, you may have overmixed or underbaked. If they stick to the pan, let them cool a bit longer and run a butter knife around the edges. For ultra-moist cakes, don’t skip the room temperature ingredients—cold eggs or milk can make the batter curdle.
- Efficiency Note: I like to prep my frosting while the cakes bake, and set up my decorations on a tray for easy access. It makes assembly a breeze and keeps things fun!
Sensory cues are everything: the cakes should smell sweet and fragrant, feel springy to the touch, and look lightly golden on top. If you see tiny bubbles on the surface, that’s a good sign—they’ll be extra tender inside. Enjoy the process, and don’t stress over perfection. Sometimes, the wonkiest cakes taste the best!
Cooking Tips & Techniques
Baking mini cakes is honestly a lesson in patience and precision (with just a hint of improvisation). Here are my top tips for nailing this mini cakes recipe every single time:
- Use Room Temperature Ingredients: Cold eggs and butter can cause the batter to seize or bake unevenly. Set everything out 30 minutes before you start—trust me, it makes a difference.
- Don’t Overmix: It’s tempting to beat the batter until it’s silky smooth, but too much mixing develops gluten, making cakes dense. Mix just until combined for a light, tender crumb.
- Watch Your Oven: Mini cakes bake faster than regular cakes—keep an eye on them at the 15-minute mark. Every oven is a little different (mine runs hot, so I check at 14 minutes).
- Test for Doneness: Use a toothpick or cake tester. If it comes out clean or with a few moist crumbs, they’re ready. Overbaking dries them out, so err on the side of caution.
- Decorating Strategy: If you’re piping frosting, chill it for 10 minutes first. It holds shape better and makes those Instagram-worthy swirls.
- Common Mistake: I’ve forgotten to grease the pan more than once—don’t skip this step, or you’ll be prying cakes out with a fork (been there, done that!).
- Multitasking: Prep your decorations while cakes bake. It keeps the momentum going and makes assembly more fun.
- Consistency Tip: If you want every cake to look uniform, use an ice cream scoop to portion the batter. Even sizes mean even baking.
I’ve had my share of baking fails—like sunken middles and stuck cakes. Those taught me to always double-check measurements and never rush the cooling step. Mini cakes are forgiving, but a little attention to detail goes a long way. The most important thing? Have fun! Baking is about making memories, not perfection.
Variations & Adaptations
One of the joys of this mini cakes recipe is how easily you can customize it to suit any party, season, or dietary need. Here are my favorite ways to mix things up:
- Gluten-Free Mini Cakes: Swap the all-purpose flour for a 1:1 gluten-free blend. I like Bob’s Red Mill—results are just as tender.
- Vegan Mini Cakes: Use plant-based milk and vegan butter. For eggs, try a flaxseed substitute (1 tablespoon flaxseed meal + 2.5 tablespoon water per egg).
- Seasonal Flavors: Add lemon zest and a splash of lemon juice for spring parties. Try pumpkin puree and cinnamon in the fall. Chocolate chips or cocoa powder for a decadent winter twist.
- Cooking Methods: If you don’t have a mini cake pan, use a muffin tin or even a silicone mold. For a rustic look, bake in small ramekins and serve directly.
- Taste Customization: Switch out the extracts—orange, coconut, or hazelnut are all delicious. For a fruity touch, fold in diced strawberries or blueberries.
- Allergen Substitutions: Use nut-free extracts if there’s a nut allergy. For dairy-free, swap in oat milk and vegan butter. Soy milk works too, but the flavor is a little different.
My personal favorite? Adding a layer of raspberry jam between the cake and frosting—it’s simple but feels extra special. Don’t be afraid to experiment—the best recipes are the ones you make your own!
Serving & Storage Suggestions
These mini cakes are best served at room temperature for maximum flavor and texture. I love arranging them on a tiered cake stand with a sprinkle of edible flowers for that Pinterest-perfect look. Pair them with tea, coffee, or sparkling lemonade—honestly, they fit in with any party vibe.
- Presentation: Use cupcake wrappers for easy serving, or place each cake on a pretty saucer. If you’re feeling fancy, drizzle with a little glaze before decorating.
- Complementary Dishes: Serve alongside fruit platters, finger sandwiches, or light salads for a complete party spread.
- Storage: Store in an airtight container at room temperature for up to 2 days. For longer storage, keep in the fridge (up to 5 days)—just let the cakes come to room temp before serving for best texture.
- Freezing: Unfrosted cakes freeze well. Wrap tightly in plastic and freeze for up to 1 month. Thaw overnight and frost fresh before serving.
- Reheating: If you want to warm them up, a quick 10 seconds in the microwave does the trick. Be gentle—overheating dries them out.
- Flavor Development: The flavors actually deepen after a day, so if you have the patience, make them ahead!
Whether you’re prepping for a party or just making a midweek treat, these serving and storage tips keep your mini cakes tasting fresh and fabulous.
Nutritional Information & Benefits
Here’s an estimate for each mini cake (without decorations):
- Calories: 180
- Fat: 7g
- Carbohydrates: 27g
- Protein: 3g
- Sugar: 16g
The mini cakes recipe is made with simple ingredients—no preservatives or artificial flavors. Eggs and milk provide protein and calcium, while using real butter means healthy fats (in moderation). For gluten-free or vegan adaptations, you can keep them suitable for most dietary needs. Potential allergens include dairy, eggs, and wheat, so substitute as needed for sensitivities.
From a wellness perspective, I love that these cakes are naturally portion-controlled—no guilt, just pure enjoyment. They’re a fun way to treat yourself or loved ones without going overboard. Baking at home means you know exactly what’s inside, too!
Conclusion
If you’re looking for a dessert that’s easy, elegant, and guaranteed to make people smile, this mini cakes recipe is a must-try. It’s become my go-to for baby showers, birthdays, and any celebration that calls for a touch of sweetness. I love how you can tailor each batch—whether it’s through flavors, decorations, or dietary swaps—to fit your style and occasion.
Honestly, these little cakes have stolen my heart. They’re simple enough for a beginner, but impressive enough to wow any guest. So go ahead, make them your own! Share your creative twists, favorite toppings, or funniest baking mishaps in the comments below. I’d love to hear how you bring these mini cakes to life in your kitchen.
Bookmark this recipe, pin it for later, and don’t forget to share with friends who need a little dessert inspiration. Here’s to baking, celebrating, and making memories—one mini cake at a time!
Mini Cakes Recipe FAQs
Can I make these mini cakes ahead of time?
Yes, you can bake the cakes a day or two in advance. Store unfrosted cakes in an airtight container. Decorate before serving for the freshest look!
How do I prevent mini cakes from sticking to the pan?
Grease your pans well or use paper liners. Let the cakes cool for a few minutes before removing. If they’re stubborn, run a butter knife around the edges gently.
What’s the best way to decorate mini cakes for a baby shower?
Piped buttercream swirls, pastel sprinkles, and edible flowers work beautifully. You can also top with colored sugar or mini fondant decorations to fit your theme.
Can I double this recipe for a larger crowd?
Absolutely! Simply double all ingredients and bake in batches. Keep an eye on oven times—mini cakes bake quickly.
Are these mini cakes suitable for gluten-free or vegan diets?
Yes! Use a gluten-free flour blend or vegan substitutes as listed above. The cakes turn out just as delicious with a few simple swaps.
Pin This Recipe!
Mini Cakes Recipe: Easy Elegant Desserts for Baby Showers & Parties

These mini cakes are tender, moist, and delicately flavored with vanilla and almond, making them perfect for baby showers, parties, or any special occasion. Elegant yet easy to make, they’re a crowd-pleasing treat that can be customized with your favorite decorations.
- Prep Time: 15 minutes
- Cook Time: 18 minutes
- Total Time: 33 minutes
- Yield: 12 mini cakes 1x
- Category: Dessert
- Cuisine: American
Ingredients
- 2 cups (240g) all-purpose flour
- 1 cup (200g) granulated sugar
- 1/2 cup (115g) unsalted butter, softened
- 1 1/2 teaspoons baking powder
- 1/2 teaspoon baking soda
- 1/4 teaspoon salt
- 2 large eggs, room temperature
- 1 cup (240ml) whole milk, room temperature (or almond/oat milk for dairy-free)
- 1 1/2 teaspoons vanilla extract
- 1/2 teaspoon almond extract (optional)
- For the frosting:
- 1/2 cup (115g) unsalted butter, softened
- 2 cups (240g) powdered sugar, sifted
- 2–3 tablespoons (30-45ml) whole milk or cream
- 1 teaspoon vanilla extract
- Pinch of salt
- Optional decorations:
- Edible flowers
- Fresh berries (raspberries or blueberries)
- Sprinkles or colored sugar
- Mini chocolate curls
Instructions
- Preheat your oven to 350°F (175°C). Lightly grease mini cake pans or a muffin tin, or line with paper liners.
- In a medium bowl, whisk together flour, granulated sugar, baking powder, baking soda, and salt.
- In a large mixing bowl, beat butter until smooth and creamy (2-3 minutes). Add the dry mixture slowly, blending until crumbly.
- Add eggs one at a time, mixing well after each addition.
- Mix in milk, vanilla extract, and almond extract. Beat on low speed until just combined; do not overmix.
- Spoon batter into prepared pans, filling each cup about 2/3 full.
- Bake for 15-18 minutes, until tops are golden and a toothpick comes out clean.
- Cool cakes in the pan for 5 minutes, then transfer to a wire rack to cool completely.
- For the frosting: Beat butter until light and fluffy. Gradually add powdered sugar, milk, vanilla, and salt. Mix on high speed for 2-3 minutes until smooth and spreadable.
- Once cakes are cool, pipe or spread frosting onto each. Decorate with edible flowers, berries, sprinkles, or chocolate curls.
- Optional: Chill decorated cakes for 10 minutes for sharp edges before serving.
Notes
Use room temperature ingredients for best texture. Don’t overmix the batter to keep cakes light and tender. Cakes bake quickly, so check at the 15-minute mark. For gluten-free or vegan adaptations, use a 1:1 gluten-free flour blend and plant-based substitutes. Decorate with your favorite toppings for a personalized touch.
Nutrition
- Serving Size: 1 mini cake
- Calories: 180
- Sugar: 16
- Sodium: 90
- Fat: 7
- Saturated Fat: 4
- Carbohydrates: 27
- Fiber: 0.5
- Protein: 3
Keywords: mini cakes, baby shower dessert, party cakes, easy cake recipe, elegant dessert, vanilla almond cake, tea party treats, individual cakes, buttercream frosting, customizable cakes


